 |
|
|
|
Home →
Survival →
Clothing
Birch Bark Shoes
by
Allan "Bow" Beauchamp |
| |
| In the bush, I have found there are often times
when our survival training has gotten us out of a bad situation
and back on the brighter side of things. I have not found a
lot of emphasis on the ability to establish some form of
footwear, whether on a temporary or more permanent solution to
the problem.
In the upcoming fabrication, we will discuss a temporary
system and a permanent option.
My preference is to refer to survival concepts as options, as I
feel there is not one right answer to any problem, but many, or
a better option.
So first off, what will cause an individual in the bush to
find themselves without footwear? Listed below you will find
some circumstances that I have personally come to know as causes
for such a situation, and a solution I sought to better my
circumstances.
When venturing across a frozen lake, sometimes in the process
you will go through the ice and while trying to return to the
ice surface or shore, you might lose one or both boots, thus
leaving you without footwear.
You may be canoeing down a set of rapids with boots in the
bottom of the canoe or perhaps placed loosely on your feet, and
after an upset you emerge to find your canoe, gear, or footwear
going downriver doing the natural navigational thing. Also, when
traveling in the bush, you might stop at a lake and enjoy the
welcomed cool, wet water on a hot day, only to return to find
some small animal has run off with your salty-tasting footwear.
These examples and many more will, without a doubt, leave you
without footwear.
So, as individuals who like to spend vast amounts of time in
the bush, we must ensure our mobility, because any aspect of
bush living requires the individual to have some form of
mobility.
In this writing I have outlined some options for an
individual faced with this situation.
This article I call "Birch Bark Shoes." Practicing and
understanding this technique will give you a greater awareness
as to the versatility of nature's materials. If we take the time
to understand what is available and know what options we are
trying to accomplish, we will make it.
I have found from personal experiences, being in the Northern
Bush and experiencing the wonders of nature in all four seasons,
that nature will provide all that we need, if we take the time
to listen.
My hope is, with this information, one never has to be in a
predicament where they have to endure some of nature's harshest
climates without footwear.
I once tracked an individual lost in Northern Ontario. In the
early stages of disorientation this person had lost his shoes in
some mud pit prior to going deeper in the bush.
While tracking this individual for days, it had become
apparent to myself in the early stages that this individual was
having extreme difficulty, wandering aimlessly about without
footwear. With nature's trails and the soil releases, I came to
realize, this would become too great an obstacle for this
individual to overcome in a short period of time.
Finally, when this had become an impossible task and this
individual could venture no more (thus limiting his options for
survival), this was the end of the trail and hope for any
options. There was another instance, when I had someone call me
and ask if I would be willing to take a group into the bush.
Once in the bush, I asked everyone to remove their footwear
to see who would have an option to allow them to proceed.
I have found that many people do not usually calculate this
in to their plan of options when going into the bush, or have
come to know of some options. So what are our options?
Without an immediate solution to our being without footwear,
one must find something on a temporary basis to protect our
feet, as anyone can attest to at some time in their life, when
suddenly stepping barefoot on sharp rocks or harsh substances.
In a bush situation this is not a place to be barefoot or in
sock feet, as this will only lead to injury, pain and infection.
And if one should end up in such a situation, the rest of our
options are virtually impossible to perform, as most require
some form of mobility.
Anything temporary is just that -- temporary. But, it will
afford you the time and protection needed to stabilize your
crisis situation.
In nature, this temporary footwear task can be accomplished
by looking around the area, first for a soft dry protective
layer to go against the foot. This will give you comfort and
distance from the ground.
Any soft items such as windblown grasses, cattail down, a
compressed hive, dry moss leaves, etc., will soften and protect
the foot. Secondly, for the outer layer and a means of engulfing
the foot, this is accomplished with sheets of birch bark, a slab
of willow bark, a woven reed or birch layered mats, any firm
encompassing material that is durable for a short time solution.
To keep these protective layers securely on the foot, any
lashing items will suffice. This can come from a belt, string,
duct tape or even a roller bandage. Maybe yarn from your sweater
woven into cordage, a spruce root, making birch bark cord and
many more options will give the securing needed.
At such time as your situation has stabilized, and you now
have the opportunity to establish more protective systems, this
is a good opportunity to start the fabrication of a permanent
footwear option.
Usually most individuals at this stage in their situation
seem to have lots of time. This system of constructing footwear
will allow you to maximize this time and will assist in keeping
the mind agile, but give a great sense of accomplishment when
completed.
From this technique you will have many ideas begin to form in
your mind and other comforts you can obtain in your situation,
such as birch bark sleeping bags to fill with cattail down to
sleep in instead of on the ground, birch back pack sacks to
allow you to transport forded supplies and many more ideas we
will cover later. |
| |
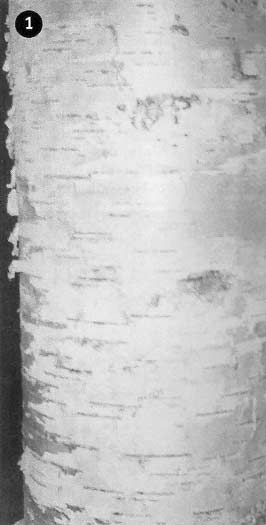 |
These birch bark
shoes, when constructed in the fashion we will
describe, give the best comfort and mobility, as
bush ground is very uneven and slippery in most
cases. The shoe to be constructed is naturally made
of birch bark from the white birch tree. This tree
is classified as a hard wood and is plentiful and
very visible in most areas. See photo 1.
The white birch tree is a very versatile tree, and I
am sure will offer many options to an individual
faced with unforeseen circumstances. Some of its
versatile uses include water, fuel, navigation,
shelter, cooking and medicinal to name a few.
When a stand of white birch is found, use
whatever cutting implement you have at the time. Cut
a strip vertical down the tree and pry back the
layers of bark.
In the spring the bark will release from the tree
easier, being your optimum, but even if it is not
spring, this can still be accomplished. The back for
the fabrication of the shoes in the photos was
acquired in late November. This will ensure the
reader that late season bark will also serve our
purpose.
|
|
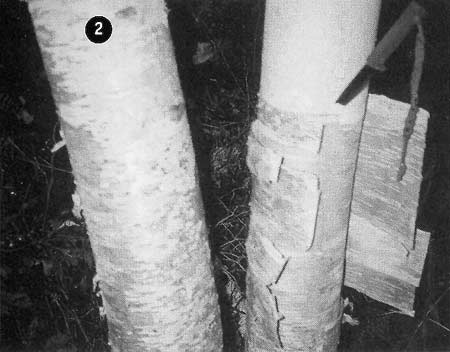 |
With the vertical
strip cut, there will be the outer whitish layer and
the "leathery" brownish layer. The best I find for
fabrication of the shoe is the brownish layer, but
as the photos depict, I have also crafted with the
outer layer. From photo 2 you can see the
difference between the tree's exterior and the
interior back layers. Provide yourself with a good
number of these bark sheets. The longer the vertical
cut and the bigger diameter of tree will provide you
with a bigger sheet to take your material from. |
|
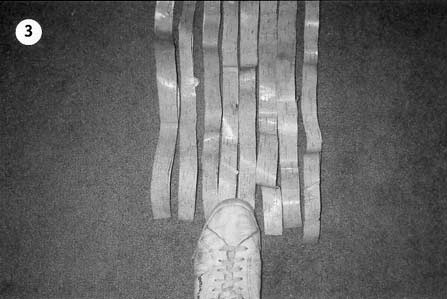 |
In photo 3 I
have taken these sheets and separated the layers of
bark, then cut strips from the bark at approximately
three quarters of an inch wide and approximately
three feet long.
Whether the strips are cut vertically across the
bark sheet or horizontally across the sheet will be
your preference. Cut a test strip from each
direction and pull until breakage occurs. This not
only gives you your strength of the strips, but a
feel for how tight to pull the strips when
fabricating the shoes.
|
|
| With approximately sixty-five strips of 3/4"
wide and 3 foot long, I lay the strips as shown in photo 3
to get a gauge for how wide to lay them. Use your foot as I have
done with the shoe in the photo, or draw an outline in the dirt
of your foot's dimensions. Lay approximately eight or nine
strips lengthwise on the ground, and this should accomplish this
task.
When cutting birch strips from a round tree and trying to lay
them flat on the ground, they will seem springy.
So to reduce some of this springy memory, soak these strips
in water if available. This should assist greatly with the
springiness and also later when the weaving process has begun.
You will see that the wet slick strips not only slide easier but
form to mold better. |
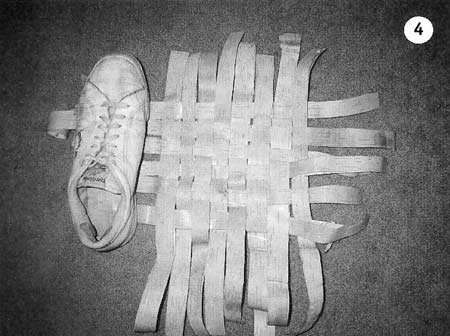 |
In photo 4 you
can see the weaving process begin with strips laid
lengthwise. Now put some strips width-ways, starting
at the midpoint of the length strips and coming
across the length strips. Take one strip at one side
and go under a length strip first, then continue on
to the strip laying beside it and go over that
strip. Then proceed to the next strip and under
again. Continue this process until you have achieved
the look of the matting in photo 4. Snug the
strips up now to remat any gaps and to ensure a
solid weave. |
|
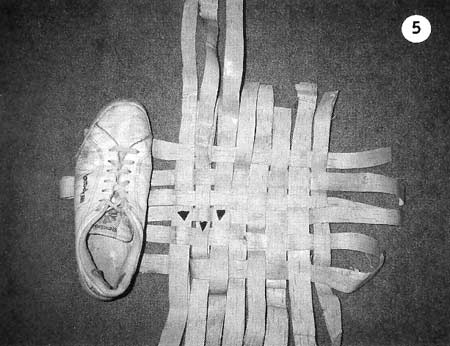 |
Some ideas, as I
mentioned earlier, will start to develop in your
mind for how to use this technique for other
comforts: possibly shelter walls, a rain catcher, a
sun shade, etc. Photo 5 shows a process of
how to add length to the strips to allow you to make
your matting longer or wider. I have cut the ends
of my strips to a point. This facilitates easier
weaving of over and under.
Add enough strips length-ways and width-ways to
your mat that will give you the size desired.
If you go wider or longer at this point, it will
greatly assist your fabrication later on as you will
see in the photos.
|
|
| The matting that is being constructed at this
point forms the sole of your footwear, and the added length of
strips that are put in, add to your thickness. |
 |
So one stage
complements the other. In photo 6, this is
the length and width at this point. I find it
beneficial for the length at this stage to be
longer. This will facilitate much easier curvature
of the toe section once the front of the shoe is
pulled over. |
|
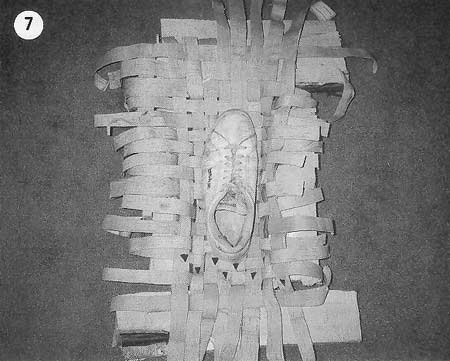 |
Photo 7 gives
you the idea now of the benefits of the matting
being extended beyond your initial dimensions. If
you feel that more matting is needed, this is a good
opportunity to add to your mat. If sufficient
then, place your foot onto the mat and find
something to assist in forcing up the sides. This is
only necessary if you feel you cannot hold the
strips in one hand and weave with the other.
In the photo, I have used some pieces of willow
that are soon to become my fireboards.
Look for a couple of logs or stones in the bush
or dig in the sand a small depression, a little
wider than the dimensions of your foot you drew
earlier. |
|
| With time and practice, you will find fewer
items will be needed for assistance. In photo 7 the
heel is placed where the overlapped strips stopped. Push down on
the shoe, or push your foot onto this matting and force the
sides up to start to mold your matting into your foot
dimensions.
If the shoe's dimensions were out of proportion to your foot,
this would only facilitate a sloppy shoe and would not be as
effective for mobility.
With the toe section being woven past the tip of the foot,
now the front section is rolled over towards the tongue of the
foot. Thus, the task of holding and weaving strips is much
easier in the forming of the top section. |
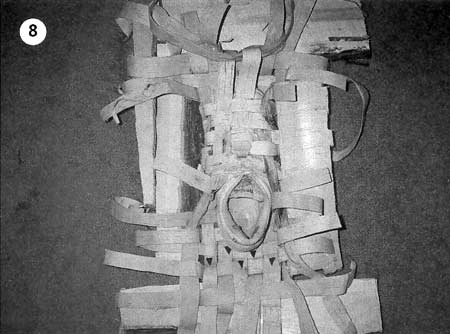 |
Photo 8 shows
how this toe section is pulled up towards the top of
the tongue, and this edge now becomes the starting
rim where your foot will ultimately slide into.
Now that you have the woven mat placed against the
tongue section of the shoe, use the width strips to
join the sides of the shoe to the top mat section.
While still applying the over and under process,
at this stage of adding layer upon layer, the wet
strips give some advantage with their slickness. As
the stiffness of the shoe becomes apparent, so does
the tightness in between the weaves. |
|
| To help send the strips through this tightness,
the cut, arrowed ends assist in weaving. When pulling these
strips through, snug them up and keep the form of your foot in
mind. The tension you can apply on these strips, as you will
see, is considerable, as first seen in the test strips. This
will, no doubt, give you the idea for the cordage we mentioned
earlier.
Continue this process all around the shoe, as the front
matting has started the rim of your shoe to slide your foot
into.
To fabricate the rim for the rest of your shoe, you will see
that when pulling up the sides, a long length strip will go
right around the heel section, thus giving you the rim of your
heel section for the rest of your strips to weave into.
When you have strips that are longer than your rim, do not
cut them off. Just fold them over and weave on the inside with
the extra length. This adds layers to your shoe and stiffens the
shoe.
Now, to add layers to the inside toe section. This is a
difficult task, but if you in the first couple of photo (photo
5 & photo 6) added an extra layer or two, you now
have gained the thickness inside the shoe in that section and do
not have to do the toe section at this stage with extra length
strips. Weave these around the shoe also. |
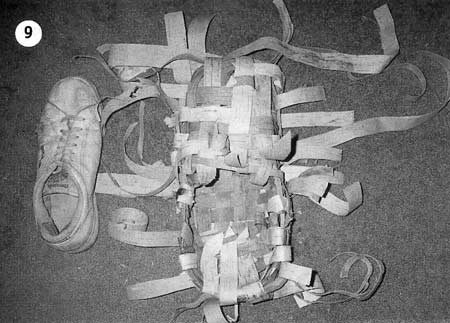 |
In photo 9 we
see a somewhat completed formation of the shoe,
close to dimensions. At this time, it is best to
tighten up the straps and mold the matting and keep
adding layers of straps to the exterior and interior
of the shoe. The amount of layers one adds will
depend on the amount of protection they wish to
achieve. My preference is to add lots now to save
having to add lots later.
At this point in fabrication of the shoe, it
might feel somewhat "springy." This is normal. By
adding more layers and tightening the straps and
removing any gaps, soon the springiness will be
replaced by solidness. |
|
| If your first shoe is imperfect, this can be
overcome with practice and visualization. Try making a miniature
model at first, say, the size of a children's shoe. This will
assist you with forming, holding and weaving the shoe and get
the final product more quickly so you can see where you will
have some difficulties prior to forming a full-size shoe. |
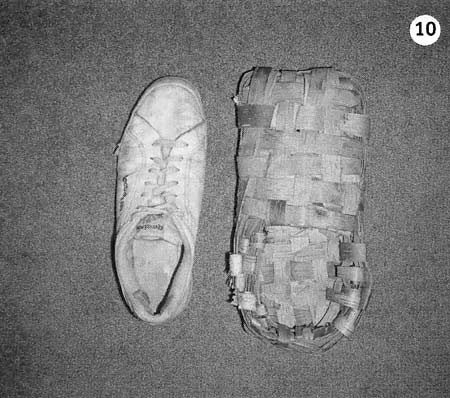 |
With more strips, lots
of tension applied and all gaps reduced, your shoe
should look close to photo 10. At this
stage your shoe will easily fit inside the formed
shoe. This is the advantage of a shoe, rather than a
boot style. The shoe allows more flexibility of the
foot in negotiating the bushes and uneven ground,
where a boot style has a limited range in the
forward motion.
A low shoe doesn't offer much protection in the
shin area. This can be supplemented with a slab of
birch bark under your pant leg or wrapped around
your leg and secured with one of the means described
earlier. |
|
| The shoe at this point is still not
form-fitting enough to eliminate shoe wobble. This is achieved
with the help of cattail down, dry leaves or grasses-any dry,
soft substance that will warm the foot, compress to contour to
the foot and will not cause abrasions. |
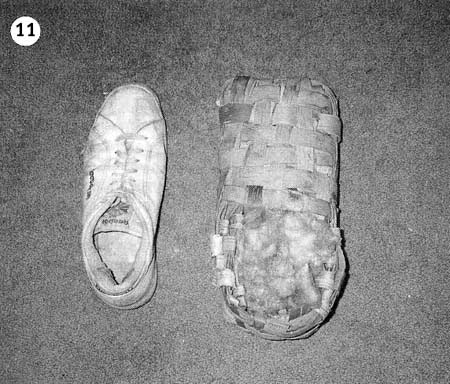 |
In photo 11 you
now see the shoe filled with cattail down. This
substance not only warms, but contours well and
gives the foot protection on the inside against the
edges from the strips, as the strips give the foot
protection from the edges of the earth. Using a
small twig, you can force in a lot of down around
your foot and fill in the hollows around the foot,
causing a tightness to occur which will assist in
walking.
|
|
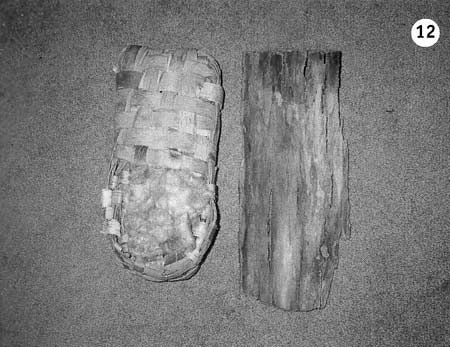 |
To add to our already
manageable shoes, I offer more options to protect
our shoe even further, as seen in photo 12.
This is a slab of willow bark, off my walls. This
will be placed on the bottom of the shoe to offer
another layer from the elements and to protect the
strips as well.
In early mornings when the dew-laden ground
becomes slick, this rough bark will give you some
lateral stability when negotiating the uneven
ground.
|
|
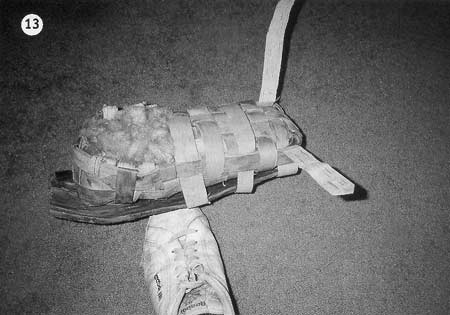 |
In photo 13 we
see that the attachment of this slab to our shoe
follows the process in which the shoe was
fabricated. Put as many strips as needed to tighten
the slab to the shoe to ensure the slab stays
solidly attached. With the extra strips of bark,
keep these for your journey, because as you are
mobile, the strips will wear out or tear. This is
easy to rectify as the extra strips can be woven
back into the shoe on the move.
|
|
| During your night of fabrication should you
receive a good blanket of snow and are in need of some flotation
on the snow, this can be accomplished with more bark placed to
the side of the bark, increasing the width of the shoe's
surface, or use a wider piece initially. To fully see the
advantage of your birch bark shoes, remove one shoe and travel
for awhile. Experience will be your best teacher.
Whether you prefer these shoes with the bark on or off will
entirely depend on you. I feel, if you have the advantage of
extra protection, utilize it.
Now that you have stripped the bark off the birch trees in
your area, I am confident the contrast of white exterior and
brown interior as seen in photo 2 will assist your
situation, affording you another option.
In closing, having the opportunity to go into the bush and
practice our skills, which enhances our comfort and
survivability, is an opportunity that should not be taken for
granted but respected.
Our respect should come in the form of utilizing the
material, but only that which we need to accomplish those tasks.
This way we do not rob our children's children of the
opportunity to go into the "bush."
The "bush" is the greatest teacher one could sit and listen
to.
You will learn more about natural navigating by following a
wolf, than my global positioning system (GPS) will teach you.
Nature will never steer you wrong!
Article and Photos Copyright
©
Allan "Bow" Beauchamp.
This article originally appeared in
Wilderness Way magazine,
Volume 5, Issue 1. |
| |
|
|
|
|
|
|
|
|

