|
|
Home →
Survival →
Fire →
Handdrill
Bow's
Hand Drill Extender: The Milkweeds
by Allan
"Bow"
Beauchamp
|
|
|
|
When traveling deep in the Canadian bush, I have often
made a great primitive camp. I enjoy getting out in the wilderness,
and after
all the work is finished, I can just sit and enjoy my surroundings or
maybe even do some exploring. I always enjoy sitting alone in the bush
when it is nice and quiet. On one particular outing after I finished
making my camp ready I had the opportunity to venture around and look
for new " options." This is where the learning curve comes in. From time
to time, when I have these opportunities, I like to refine " old II
skills as well as try and develop "new" ones.
I have always enjoyed trying new fire starting techniques. For many
years, I have enjoyed fires from my "fireboard" set, as well as my "two
stick" fire set. If you enjoy starting fires in a primitive manner, you
will most probably enjoy reading this article.
You may have the milkweed plant in your area. If not try and find a
plant that will offer the same characteristics, and that will offer you
the same "options."
One particular afternoon, while I was venturing out with my bush
roll, and my handy hand drill sticking out of it I came across a great
idea. I was walking in some very slippery conditions, and all of a
sudden it dawned on me, what if I fell and broke my finely crafted hand
drill? What other "options" would I have? I decided that after I got my
camp set up, I would look for a better "option." |
|
|
|
Photo 1
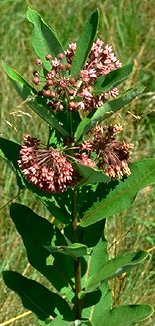 |
I came across a milkweed plant.
Photo 1. This photograph should make the plant fairly easy to
recognize. I was going to harvest it initially because I wanted to
spin some cordage with the stalks. After I had cut it, I noticed its
shape.
[For more info on milkweeds, and assistance in identifying them, please visit
the Ontario Wildflowers
website, and look for Milkweeds.] |
|
|
|
|
Photo 2
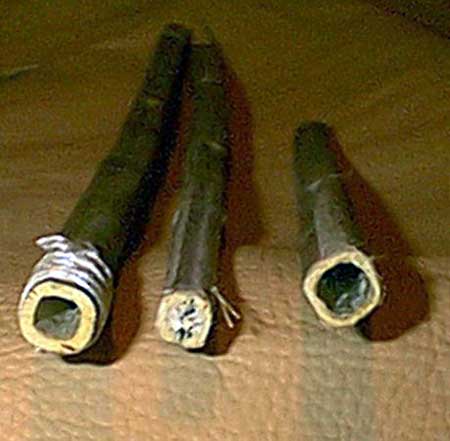 |
Photo 2 shows the milkweed
plant after it has been cut. (This was why the shape had been of
interest to me.) The inner stalk was hollow, and it had a
rectangular shape. However, most of all, the walls of the dried milk
weed stalks were also very firm. |
|
|
|
|
Photo 3
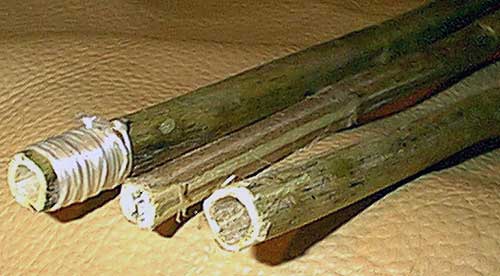 |
In Photo 3, you can see a side
view of the dried milk weed stalks after being harvested. I have one
stalk that was cut and hollow in the core, while the other one was
smaller, and not hollow. You can also see that I have used sinew to
wrap up the hollow stalks in preparation for the project that I
wanted to accomplish. Note: If you are looking for milkweed stalks
that are hollow, look for the stalks that have the biggest
diameters. |
|
|
|
|
I was looking for a better way to carry the parts that I needed without a long
hand drill sticking out. The idea of simplifying this process was what I
needed-where I could have a "plug" tip for my hand drill. You can see the
sinew that I used on my milkweed stalk is wrapped against the exterior of the
stalk. This allows for a tight fit of my "plug" when it is inserted in the
stalk, and holds the rectangular shape of the stalk together nicely. This will
eliminate any slippage that might occur during twirling the stalk. |
|
|
|
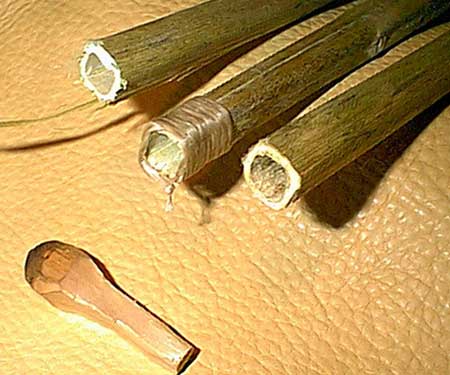
Photo 4
 |
Photo 4 will show you the
components of my hand drill extender l' option." You can see a fresh
milkweed stalk that I left some fibers protruding. If you did not
have any sinew for this wrapping stage, you can read my article
called "Bow's Bindings".
It will assist you in forming a good, strong cordage with this extra
fiber from the milkweed stalk to accomplish this task. Also, seen
in this photo is my hand drill "plug." It is a small piece of cedar
that I had collected from a branch.
Now I felt I had a great "option" for hand drills. I could just
carry my hand drill "plugs" in my coat pocket. Whenever I needed to
build a fire, I just found a hand drill milkweed stalk, put the two
together, and twirl away. |
|
|
|
|
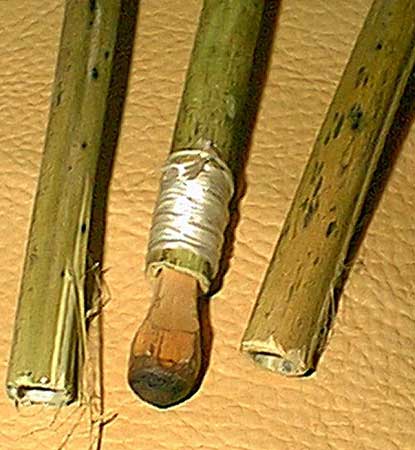
Photo 5
 |
In Photo 5, you can see the
hand drill "plug" that I use most often with my milkweed stalk
combinations. This photograph shows a better view and some notable
features. When you look closely at the "plug" for the hand drill,
you will notice that I have made the exterior walls of the plug
square to fit the milkweed stalk, thus, allowing for minjma1
slippage. I have also tapered the "plug" as well. The reason for
this is to force the walls of the milkweed stalk to expand against
the sinew, or cordage. By doing this, it really tightness up the two
components. When you are twirling away with your hand drill, and you
are finally at the point of getting that long awaited coal, you do
not want your hand drill extender to fail. |
|
|
|
|
Photo 6
 |
The completed system is shown in
Photo 6. The "plug" is seated nicely in the milkweed stalk, and
I have let it protrude a little bit. The reason for this is that
when I use my hand drills, I prefer to use nature's gifts as much as
possible. For this particular article, I chose to do just that. I
used some birch fungus. When twirling in fungus, it has a tendency
to allow for lots of fungus debris. This extended plug will give
room for this extra debris. |
|
|
|
|
Photo 7
 |
In Photo 7, you can see the
front of the cedar "plug." This photograph was taken after I had
started a coal with it. Notice the plug is recessed more now, as I
had mentioned earlier. It seats nicely and allows for a tight fit.
At the tip of the cedar plug, I have found that if the front of the
plug is a little wider than the stalk, it will allow for a much
easier twirl. Also, when you are pressing down when twirling the
hand drill, all of the pressure will be focused to the sides and on
the bottom. This means less twirling, and producing the best
possible friction results. |
|
|
|
|
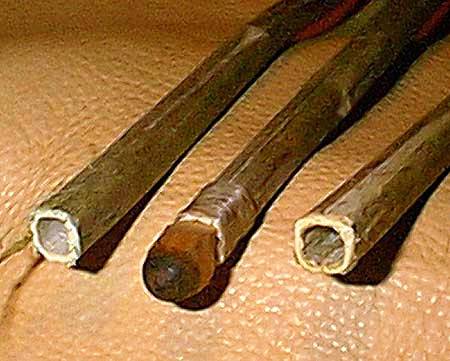
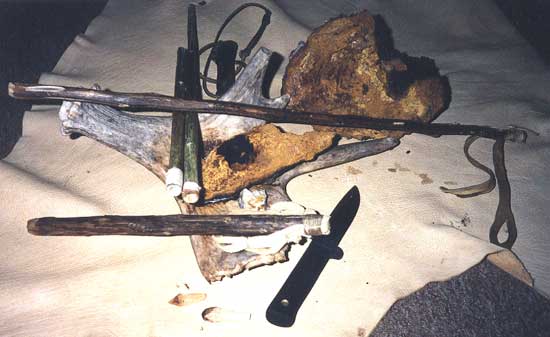
Photo 8
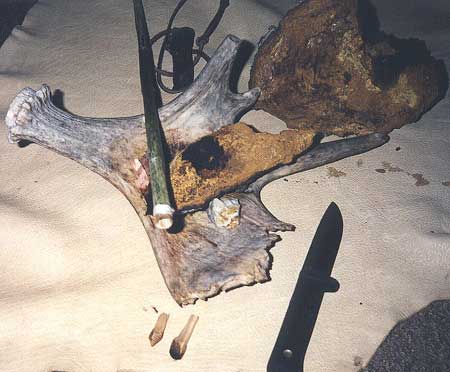 |
Photo 8 shows the final
product. You can see the milkweed hand drill with the sinew wrapped
around the stalk, and ready for the cedar plug. Two types of plugs
are also shown -- the plug on the right has a more rounded shape,
while the plug on the left has a more tapered end. In the
background you see a piece of fungus I have harvested from a birch
tree. |
|
|
|
|
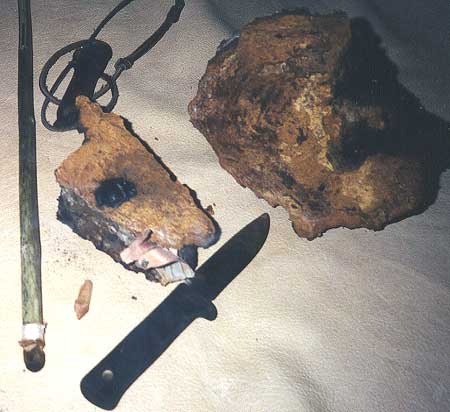
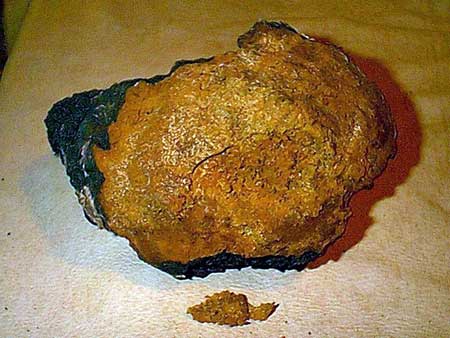
Why Use More Than One Type of Plug? I use many types of things as
hearth boards in the bush, and I find each one has their own unique differences.
I carry a couple of "plug" styles in my coat pocket, and depending on the hearth
boards I find, I use the best selected plug for the job. |
|
|
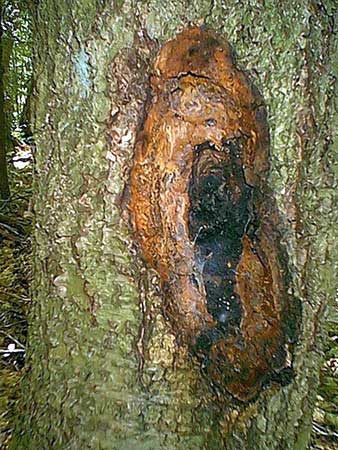 |
Photo 9. I have sliced a
smaller piece off of the big fungus to use as my hearth board. You
can see the result of cutting this fungus from the tree. It has left
a very big hole. I try and fill this hole with sap from another tree
to give the tree an opportunity to recover. True, it is just a
fungus, but it was part of the tree. |
|
|
|
|
Photo 10
 |
Photo 10 shows how I will
utilize this "option." The position I am using seems a bit
unorthodox for hand drills, but the weight of the fungus saves me
from having to sit in front of the hearth board. With the milkweed
stalk being forced into a rectangular position from the tapered
plug, I find I gain some gripping from the square sides that allow
me to keep the stalk better positioned in my palms and not slide
forward on me. This ensures a more efficient twirl producing a
better and quicker coal.
|
|
|
|
|
Photo 11
 |
In Photo 11, you will see that
from my efforts and twirling action, we are producing a lot of
charred material. This, of course, is what you are trying to
achieve. |
|
|
|
|
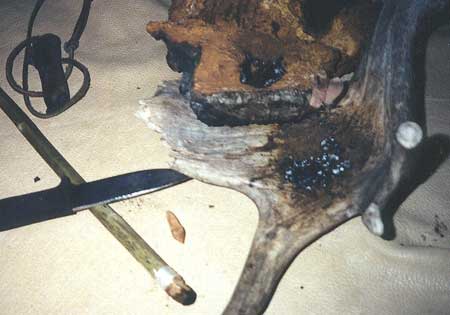
Photo 12
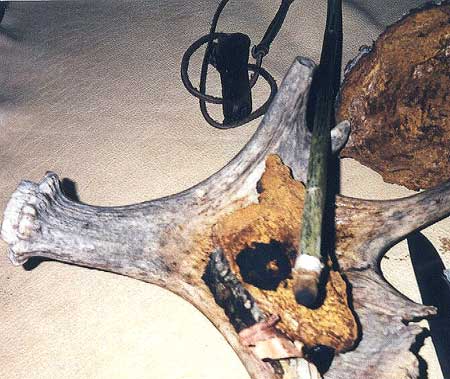 |
Photo 12 shows that I have
stopped the twirling with the intent to allow you to see the cedar
"plug" in action when I am about half finished. You can see the size
of the plug in comparison to the milkweed stalk. This has advantages
as it allows for a smoother drilling and not much friction loss on
the sides while it works deeper into the fungus while you are
twirling. Also seen in this photograph, is the amount of black
char that the fungus is starting to produce -- a great asset when
starting a fire with the hand drill. It also shows that the
combinations that I selected for the plug and this particular fungus
hearth board were well suited. You will find that not all fungus is
a good match when they are combined. A little trial and error to
learn how to better select the proper fungus selections prior to
harvesting will pay big dividends later.
|
|
|
|
|
Photo 13
 |
In Photo 13, you will see the
piece of fungus is now developing from the heated twirling stage to
forming into a coal. The heat produced will transfer to the fungus
slowly, but it will transfer. Patience pays off. Notice the shape
of the piece of fungus slice that I have used for the base. It was
very stable when I was twirling and applying the needed downward
pressure.
One advantage that I had was the coals were sheltered from any
wind or bad weather. This is a big advantage when you are using this
primitive technique for fire starting. It was not only sheltered
from the wind, but also, from the ground's moisture as well. This
can be a real advantage if you are traveling in wet weather, or when
the snow has just melted and the ground is saturated.
|
|
|
|
|
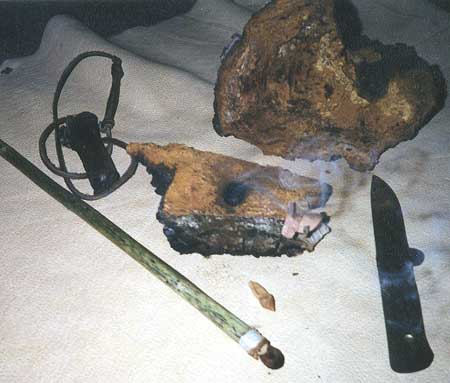
If you view the cedar plug, you can see where all of the friction has been
placed while I was twirling. The dark spots are very predominate, and the whiter
side indicates we have gotten the most from our twirling. I focused more on the
thicker rounded base giving me a quicker coal. |
|
|
|
Photo 14
 |
In Photo 14, you can see that
with the right combinations, some hard work, and a little patience,
you will have the coal that you need for fire starting. |
|
|
|
|
Photo 15
 |
With the rounded plug, you can see the
drill plug has not gone very deep at all. The advantage for this is
that should we choose to continue using this particular fungus for
more fire starting coals, we simply dig out that cl1arred rounded
section, and place it in a bird's nest tinder pile, and blow it into
a flame. Then, you can keep this fungus piece for another day:
Photo 15. I now have the "option" to make it into a fire, or
save the fungus for further fire starting attempts. |
|
|
|
|
Photo 16
 |
In Photo 16, you can see a
number of hand drill combinations. I like to have many "options,"
because I have found when traveling in the bush in northern Canada,
the weather can change very quickly. If you do not plan ahead, it
could turn into a very bad bush experience. |
|
|
|
|
I have often found myself alone very deep in the bush in -40°P weather on
snowshoes late at night. There have been many times when I have been very
fortunate to have so many " options." It is my intent to allow you the
opportunity to share in some of these "options" that I have learned from being
in the bush with the articles that I write. It will make your time spent
outdoors a safer and more rewarding experience. Remember: Always respect nature,
and she will be good to you. |
|
|
|
|
|
 |
This shows the side of Tinder Fungus
facing the tree. |
|
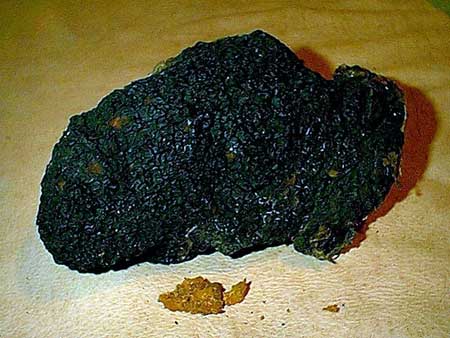 |
This is what Tinder Fungus looks like
on the outside. |
|
| |
|
This article originally appeared in Wilderness Way
magazine. Reproduced here with permission of the author.
All photographs and
written content Copyright ©
by Allan Beauchamp.
[For more
info on milkweeds, and assistance with identifying them, please visit the
Ontario Wildflowers website, and
look for Milkweeds.]
[For more info on Tinder Fungus, visit the
Tinder
Fungus section of this website.]
[For more info on Birch Trees, please visit the
Ontario Trees website.] |
|
|
|
|

