 |
|
|
|
Home →
Survival →
Navigation
Natural Navigation, Part I
by
Allan "Bow"
Beauchamp |
|
|
|
I have always been amazed when I hear individuals refer to
natural navigation techniques -- I am amazed at how little we
know of this subject. In our modem era, man has come to rely on
all sorts of fancy tools, from a compass and map to a global
positioning system (GPS). While these Will aid the bush traveler
in keeping his bearings, I have come to realize that they are
not always there when you need them the most. I personally
prefer to have more options to ensure my safe return home. Try
a personal test. Get into your car and drive down a bush road
away from town. Take a pencil and paper. Go into the bush, sit
down, and ask yourself, "What do I see that will assist me in
finding my bearings?" The more you write, the less chance you
have of getting lost if you become disoriented when you are
separated from your gear. The less you write, the greater the
chance you have of getting lost if you become detached from your
gear.
So the more natural navigating techniques one has to find his
bearings, the more success the individual has of making it home
safely.
In this article, I will try to show you some of my ways of
using nature to keep my bearings. We will start this topic off
with simple visual clues. Later articles will go more into
minute visual clues.
An article cannot teach you all nature has to offer for
assisting the traveler in staying on course. This you will have
to do on your own, aided by some exercises by which I will
assist you in seeing some indicators. The more time you put into
this "Dirt Time" as I call it, the more rewards you will see.
Every time I go into the bush, something new will catch my eye,
and I have to go examine and verify these findings.
I have a saying I use when taking individuals into the bush:
I am not here to teach you. I am here to show you where you can
find your own answer if you seek it. Nature does the teaching.
As a small boy, I got lost during the middle of winter in a
place that stays about forty degrees below zero for two weeks
straight. I still recall wandering aimlessly through the snow,
then looking across a swamp and deciding that direction is where
I should go.
After walking the better part of the night, I eventually came
out of the bush to a place that I recognized. It was a remote
sand hill on the outskirts of town where my dad had taken me
sledding.
I went up onto the highway, and a police officer on patrol
picked me up and brought me home. As a small six year old, lost
with no formal skills and insufficient intellect to analyze the
situation and develop a plan, I was driven more by instinct than
logic. I survived, and so can you as you have the opportunity to
learn more about natural navigating, thus increasing your
instincts. You too will have more options for surviving.
I recently took some helicopter pilots into a remote bush
site we could reach only by plane. The fears of being lost, then
of being in the bush, took over. Understanding this, so as not
to make it too rough on them, they were allowed to bring their
choice of equipment -- as long as it would all fit into the palm
of their hand.
After four days in the bush at thirty-three degrees below
zero, they realized that nature has more to offer them than they
could have imagined. The fear of being lost after a crash has
been alleviated; they now look at being in the wild as a
learning experience. As pilots, navigating is a big factor in
their jobs; they saw firsthand the advantages of some of the
techniques that I will try to convey to you. By the end of the
training, each of the pilots could walk around the bush and show
me at least ten natural navigating techniques very easily.
These pilots were from around the world: Switzerland, France,
Germany, China, and Canada. These natural navigating techniques
have to be capable of being brought back to where they will fly
and be effective, as without a doubt lives will depend on them.
What is it that will keep these pilots and you from getting
lost? Nature's indicators, plain and simple. We have to be aware
of what nature is saying. when you first look at something in
the bush, ask yourself, "What is this telling me?"
Some of course, will see just the object. After this
three-part article, it is my hope that you see what I see.
I tell people to find at least ten indicators to increase their
accuracy. The more you know, the less you go wrong.
When you first look for markers in the bush, be aware of
things that are happening all around you every day, all year
long. For instance, the wind, sun, moon, rains, the changes of
seasons, etc.; all of these will assist the knowledgeable bush
traveler.
Let's start with the most basic facts: the sun rises in the
east and sets in the west. The moon also rises and sets the same
way.
Find out about the prevailing winds in your area or the area
into which you will be traveling; the prevailing winds here
(northern Ontario, Canada) are from the northwest.
Now let's use some of these facts to gain insights into
natural navigating. When you first start trying some of the
practical exercises, take your compass along to verify your
results. This will instill confidence in the techniques and your
abilities. Eventually, this will be just a carry-along item.
As with all things, natural navigating has some exceptions to
the rule. A canyon can create its own wind. This will change
your prevailing winds' direction. A naturally sheltered area,
from a mountain or large stand of trees, can also change the
accuracy of your direction indicators. This article will try to
illustrate some of these exceptions.
The accompanying photos highlight what I am trying to
explain. This is sometimes very hard -- there is nothing like
being there. I encourage individuals to go into the bush for
themselves and see/experience what it is I am talking about.
With any technique, experience is the best teacher. |
|
|
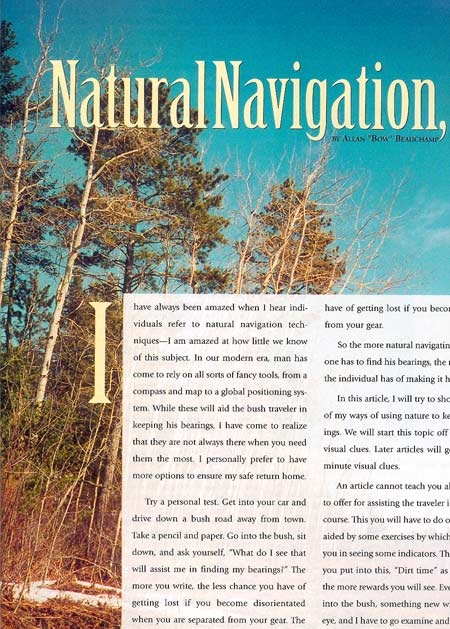 |
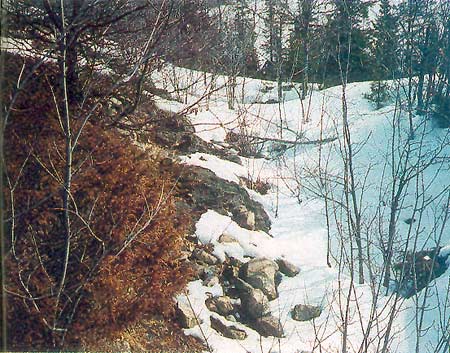
Photo 1
[Unfortunately, the first page of the article is
printed right over the photo, so the details
referred to in the text are hard to see.] |
|
|
|
|
In our walk through the swamp to find natural indicators, we see
some poplar trees (photo 1). First, we ask ourselves,
"What do we see?" Let's think of nature's factors that are at
work. First, we will determine the winds; they are prevailing
from the northwest. As we view this photo, we can see that the
bare trees at the left side of the photo are not too bent. But,
as you look at the right side of the photo, you will see the
bend in trees is very great. What you can't see just left of the
camera's range is a natural windbreak, sheltering the trees in
the left side of this photo. This windbreak has created an
exception to the indicator about the prevailing wind. However,
on the right side of the photo, the poplar trees have a great
bend to them. This "bending" is caused by a constant pressure on
the tree over the course of its life cycle. After being thus
forced, it has grown a natural curve.
So we know the prevailing winds are from the northwest. We
determine that the bend of the tree causes it to point to the
southeast. This technique will also work in the dark, as all one
has to do is point one's flashlight up into the tree and gain a
direction indicator. On a bright moonlit night, you will not
even need a flashlight. From viewing one photo, we now have
gained a day technique and a night technique.
There are no special secrets to this natural navigating, just
look at what nature is telling you. The only thing necessary is
to practice seeing it. Some dirt time training will, without a
doubt, increase your observations. Are we done with this photo?
We will see.
Think back to all the times you have seen a big old pine tree
with a big bend to it out on a point. All this time, it's giving
an indicator and people never see it. Some have been lost in the
bush beside trees like these and died there. |
|
|
|
Photo 2
 |
In photo 2, we
see a small poplar tree at the bottom of the larger
stand we just viewed. We ask again, "What is this
little tree telling us?" Again, we see a small bend
to the sapling echoing the other trees, so we know
this is caused by the prevailing wind. This is our
wind indicator, helpful in daytime or night. Now,
look closely at the little sapling; you can see a
whitish area on the right side of the tree, and a
darker green side on the left. What does this tell
us? Let's think about what natural factors are
working on this little tree during its life cycle.
The sun's rays are hitting this tree all day; in
this part of the world, we know that the sun's path
is from the southeast to southwest every day. So,
the little sapling is warmer on one side (south) and
cooler on the other side. On the hottest side, the
little sapling is developing a natural sunscreen to
protect the tree. This protection does not allow
premature rising of the sap, which would kill the
little tree. (The whitish powder that the tree is
producing as a natural sunscreen is worth trying
when you are walking around the bush and have
forgotten your own sunscreen. If all that walking is
getting you chaffed, you can also try this whitish
powder as a talc to eliminate the friction.) |
|
|
So, the side where we can see this soft fine powder is on the
southeast to southwest axis. This gives us another natural
indicator. It is worth mentioning that older trees often have a
hard whitish layer of bark that you should not confuse with
this. Go find a sapling out in the open, exposed to the elements
all day, with no natural shelter. This will give you the most
accurate indicator. So, is this all for our photos? We will
come back to them from time to time so you may see what you are
learning. |
|
|
|
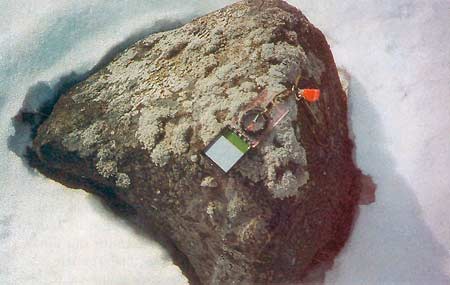
Photo 3
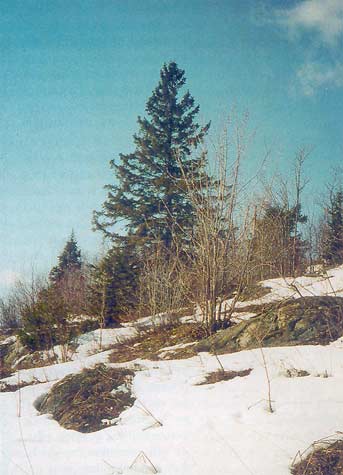 |
In photo 3 we
again ask, "What can we learn from what we see?"
In the background, we see a big spruce; from knowing
the sun's path, we now know the hottest side all day
long. This hottest side will enhance the tree's
growth, so the spruce tree you see in the background
has thicker limbs and brush on one side. The
thickest side is the left side of the tree. By
determining this, we know that the left side of the
tree is on the side of the southeast to southwest
axis. There doesn't seem to be a bend to this
spruce, so we know that wind is not a factor here.
There are small saplings in front of the spruce,
however, unlike those in photo 1 & photo 2,
there is not much bend to these saplings. You will
note, though, that the tips are trying to grow in
the direction of the sun's path.
Seeing a little sapling like this is of value to
the bush traveler who might have to make a decision
as to where in a winter storm to put up a shelter.
With no strong, constant wind, wouldn't you want to
stop there? What if it were mosquito season, and you
needed a breeze to ward off the little bugs?
Noticing small details will make your travel into
the bush an enjoyable time or a real learning
experience.
What else can be learned from this photo? We will
come back to it. |
|
|
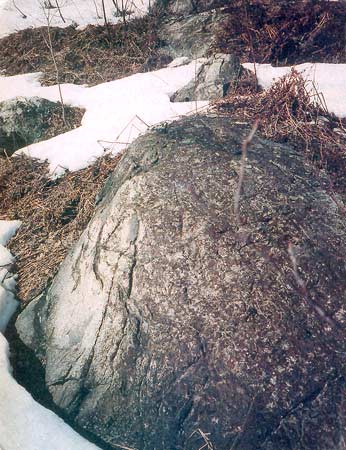
Photo 4
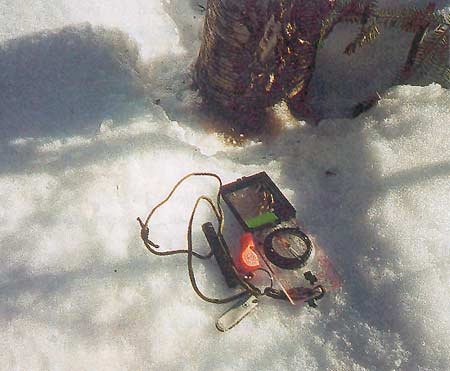 |
In photo 4 we
again ask, "What we can learn from this tree?" This
repeated question is to ingrain into the reader the
questions needed when walking around the bush. Small
things we notice will make the difference. When I
stopped to rest against this tree, I noticed
something that gave me an indicator. The warm
winter sun heated one side of this birch tree. As a
result, melted water and slush dripped predominately
on one side, accumulating at the bottom of the tree
where it refroze during the cold night. Thus a small
pile provides a natural indicator as to the southern
path of the sun. Note the compass on the ground,
verifying this assessment. |
|
|
In this same photo, we see a shadow. What does this tell us?
First, what is the sun's path all day? How will it cast a shadow
on this tree? If the sun is on one side and the shadows on the
other side, this shadow image will be where? If you thought it
to be somewhere on the northwest to northeast side, depending on
the time of day, you would be correct. The sun rises in the
east and sets in the west so any shadows made will be in the
opposite direction, again, dependent on the time. Thus, the
shadow tip method is also a natural indicator, helping you
confirm directions.
Return to photo 2 for a moment. About three-quarters
of the way down the picture on the right hand side of the tree,
we now see a small bent grass that has cast a shadow. Does this
confirm our assessment from the natural sunscreen technique
discussed earlier? Remember, don't use just one natural
indicator, look at many. |
|
|
|
Photo 5
 |
In photo 5, we
see a ravine, and we ask again, "What does this tell
us?" Well, we've established that the hottest side
is where the sun rays hit during the sun's southeast
to southwest path. On the left side of the photo, we
see an almost dry area, while on the right side of
the photo the snow is still very much covering the
ground. We determine from this that the sun will
hit the left side of the area in this photo for a
longer period of the day than the sun hits the right
side. So, the left side of the slope is the warmer
side and the right side is the colder side. The lack
of snow here is another natural indicator to help us
get our bearings. |
|
|
Photo 6
 |
In photo 6, we
see a rock. Nothing special, But we ask ourselves
again, "What does this have to teach us?" First,
notice a shadow being cast by the rock. The sun is
traveling southeast to southwest, so the shadow will
be sent from the northwest to northeast. If we look
at the top of the photo, there is no shadow. We know
this
to be the southeast to southwest side of the rock.
The shadow side is at the bottom of the picture,
which we've determined must be the northwest to
northeast side. Check the compass in the photo; this
will give you confidence in your findings. What else
will this rock photo tell us? |
|
|
We see lichens growing on the rock. They will capitalize on the
sun's hottest side, which we have determined to be the southeast
to southwest side. Just a quick viewing of this rock makes it
easy for a bush traveler to check his direction just in passing.
These findings are confirmed by the compass; the mirrored end
indicates the direction of north. We've gotten two clues from
this rock. Is there a third? Look at the bottom of the rock.
Snow has been pulling away from the rock. This we know is
affected by the sun's rays heating the rock during the day. The
rock will hold this heat, and the hottest (or southern) side
will melt the most and the quickest.
Let's take this clue back to our earlier photos. In photo
2, we now see in the bottom right corner of the photo, snow
being melted from the bank. This will again confirm our
assessment that this must be the warmest side or the southeast
to southwest side. Returning to photo 3, do the rocks in
the foreground confirm that the thickest side of the spruce was
on the southeast to southwest side? Again, if you look at the
little saplings in the foreground, you will see a shadow being
cast -- more confirmation.
As you are starting to notice with all these photos, there is
no special trick to natural navigating; you just have to be in
tune with nature's lessons. |
|
|
|
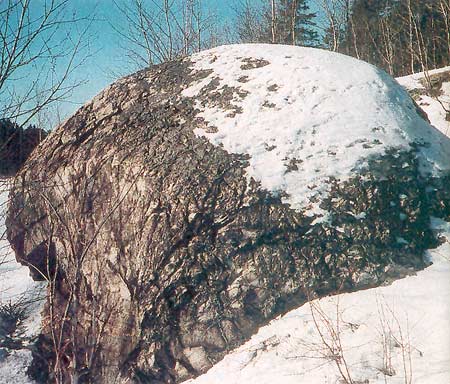
Photo 7
 |
Now, on to photo 7.
We again ask, "what is this telling us"? The first
thing you may notice is that the rock has a dark
side and a lighter side. Well, if the sun is beating
down on one side all day, every day, year after
year, we know that the sun's rays will have a
bleaching effect. Therefore, we might conclude that
the lighter side of this rock is sun-bleached and
indicates the southern face of the rock. Again we
don't want to use just one indicator, so look in the
center of the photo. Go up to about the quarter mark
and you will see a small pile of stones between two
bigger stones. The left-hand side is lighter than
the right side. Look at the little sapling in front
of the pile of stones; we see a shadow, another
indicator.
In our last photo, again ask yourself the big
question, "What is this telling me?"
First, we see a rock, nothing special to most,
but to the bush traveler, it is a vast storehouse of
information. What do we see? Half of the rock is
covered with snow; can we determine our direction
from this? The left side of the rock is the
southeast to southwest side. The darker side of the
rock is partly being covered by snow; we know this
is not getting heated as much, and the amount of
snow will confirm this. So the cooler side is the
northwest to northeast side of this rock. |
|
|
Now if you view the bottom of the rock, you will see that the
snow has melted quite a bit more on the hottest side than the
other side -- more information for our multi-level indicators.
Are there other clues? If we go back to photo 7, we see
that the bleached side of the rock is smoother. Will this assist
us in navigation? What if you were to sit down on this rock for
a break? By just feeling the rock, would you gain information
about your directions? If you were in the bush at night and
found a stone in the dark, say, out in the open, taking nature's
weather all day long, year after year, could you feel the
difference? |
|
|
|
Photo 8
 |
In photo 8, did
you see the top of the poplar trees above the big
rock? Which way were they facing? Does this add to
our findings? |
|
|
|
|
Did you notice that all these techniques dealt with information
you could gather while passing by? None required an in-depth
analysis of nature's teachings. There is more to see in all
eight of these photos, but you must first spend some "dirt time"
to gain firsthand experience. The next installment of this
series will take you farther down the natural navigation trail.
Be sure to keep this article to re-read along with the next one
which will provide even more detail. In conclusion, I am
confident you will soon feel a sense of home in the bush. I hope
you have found this interesting and that you take the time "to
see" what is out there.
Nature is the teacher. Man can just steer you to where the
answer can be found if only you seek it. Nature will never steer
you wrong. Article and Photos Copyright
©
Allan "Bow" Beauchamp.
This article originally appeared in
Wilderness Way magazine,
Volume 5, Issue 2 |
|
|
|
|
|
|
|
|

