|
|
|
|
Home →
Survival →
Fire →
Bowdrill
Primitive Survival Bow-Drill
by Peter Moc
(photos by Peter Moc except where
otherwise indicated) |
| |
|
Introduction
This is by far, the most challenging facet of
learning the bow-drill. Without a knife or cordage, the construction of a set
can take several hours longer. Much more time is spent looking for pieces that
must be just right. Most of your time will be spent walking around. Another
chunk of your time will be spent bashing and grinding wood and stone. Much more
energy is required to create the coal, and the reliability of the set and your
ability in producing a coal is less than with a knife and cord. However, the
rewards of giving birth to a coal in the purest form are worth it, even if you
never you use it in a survival situation.
|
|
|
|
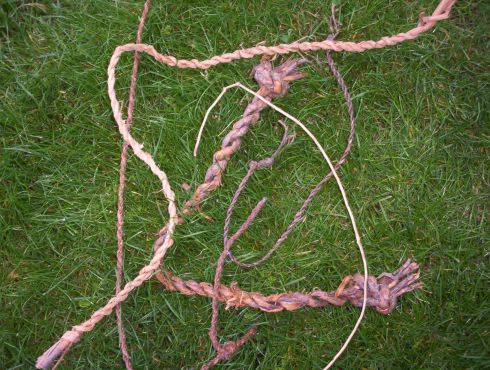
Making your own Cords
Barry Keegan is the authority on natural
materials for cords and if you want an intensive coverage of this subject than
please take a look at his article. This will be a more general discussion and
will only include the more reliable materials and methods. In terms of plant
materials, there are three main classes of potential cordage material. These
are: roots, tree/shrub bark and herbaceous fibres.
|
|
From left to right:
dogbane, basswood, white elm, bitternut hickory, white spruce root. |
Roots
The successful roots are generally those from
the coniferous trees, such as pine and spruce. Deciduous trees do not seem to
have strong enough roots for bow-drill cords but there are exceptions. As with
trying out different woods, you should make a habit of digging up a root (a
little less than pencil thickness) from a new species and testing it by trying
to break it with all your strength. If it doesn’t snap than you should
experiment with it further.
To prepare a root for use as a bow-drill
string, just dig it up, being careful not to break it. It should be about pencil
thickness, straight, and with little taper. Try to avoid roots that have major
branches. Try to get a root that is at least one and a half times the length of
your bow. Carefully remove and root hairs and “saw” the root around a tree
branch to abrade a seam in the root’s bark. Carefully peel away the bark and
wipe off the sap. Tie the ends of the root as you would for a normal string and
load it into the spindle. It will be harder to load than a regular string
because of the stiffness of the root so just ease it in. Any small roots can be
used for tie-off cordage on your bow splits. Use clove hitches as these are
easily to tie with stiff, bulky cordage.
Start stroking as you normally would, but make
sure you keep the bow pointing down away from you. If the bow is perfectly
horizontal, the root will rub on itself and abrade much more quickly. Keep the
root moist between uses. If the root dries out it will immediately snap when
used again. If it does dry out, you will have to soak it to make it pliable
again.
Tree/Shrub Barks
Barks require a little more preparation then
roots. You will need to peel off the bark without ripping it. This is easiest in
the spring and summer. First, find a relatively straight, long branch. It should
be about the thickness of your pinky finger. The longer it is, the better. It
should be twice the length of your bow. Also, make sure it has no scars or dead
sections. Cut it off the tree and remove any small branchlets. Using your knife
or by pounding an end with a rock, start a split. If the branch is curved, split
it so that you end up with two flat halves (i.e., along the flat plane). In
order to split it without breaking the wood, you have to keep the split even on
both sides. If the split starts to run off to one side, pull more on the thicker
half. Also, don’t pull back on the halves, try to keep them straight. One way
of doing this is to put the unsplit end under your armpit and carefully use both
hands at once. You can also push your thumb into the split to move it along.
Once it is split, remove the bark in the same
manner. It is not important if the wood breaks during this but do not break the
bark! In other words, you can pull more on the wooden half than the bark half.
Keep the bark half in a straight line.
If the bark doesn’t want to peel than you can
pound on it with a wooden stick. Use a smooth stick and anvil. You can really
hammer hard and pay special attention to areas around knots/branches as they
tend to stick if not hammered.
The two halves can then be reverse wrapped. You
can also just simply twist them together. This is faster but not as strong. It
is also a little more difficult to handle as the fibres are just loose. You may
want to remove the outer bark at this point as it can be quite bulky and stiff
on some trees and may wear out the string prematurely. Tie each end into a
half-hitch and use as normal. Use the same technique as for roots. Any leftover
bark can be used as tie-off cordage for the splits in your bow. Again, use clove
hitches.
Make sure you wipe down the string before use.
A damp string actually increases the grip on the spindle, which is very helpful.
If the string is too wet or slimy, however, it will slip badly. Also, letting
the string dry out a bit reduces that mushy sensation. This will absorb a lot of
your energy. The thinner your string, the less energy this sponge effect steals
away. Of course, strings can only be made so thin before they are too weak.
Thick strings will be strong enough, but getting a coal will be next to
impossible because the string will absorb all your energy. Also, the spindle
will go through fewer rotations per stroke because the string is effectively
shortened by its own girth. The maximum string thickness I would use would be
about the diameter of my pinky finger. Anything thicker just sucks up too much
energy. As with roots, bark strings must be damp when in use or they will break.
The key to using successful bark strings is the
type of species the bark comes from. Basswood and hickory are very good.
American elm will also work. Mulberry has been known to work. There are many
trees to try. Next time you are out in the woods, cut a small branch of about
pencil thickness and peel it as described above. Wrap it and try breaking it. If
it is very difficult then try making a full string from it. Make this sampling
of barks a regular habit.
Fibres From Herbaceous Plants
Finally, there are the herbaceous fibres. These
include dogbane, nettle, milkweed, etc. These are best used in the fall when the
fibres have fully developed. Remove the fibres using the same technique for
barks. Generally, the stalks will already be dry so pounding will do little
good, instead damaging the fibres. Just crush the stalk so it splits. Open it up
so it is a flat strip and break off short sections of the woody core, starting
at one end. Make sure you get all the woody bits out or they will cut into the
string in use. After cleaning the fibres, reverse wrap them and splice so your
cord is about one and a half times the length of your bow and about pinky thick.
You can dampen the string to increase the grip on the spindle.
It should be evident that you will be forced to
use a bow that is shorter than the ideal length. This is particularly true for
bark strings, which don’t splice well. Try to make your bow as long as you can
without having to compromise on the string. If the bow is long and you have to
include weak sections of cordage to cover the length, you well just end up with
a broken string.
|
| |
|
Stone Tools
|
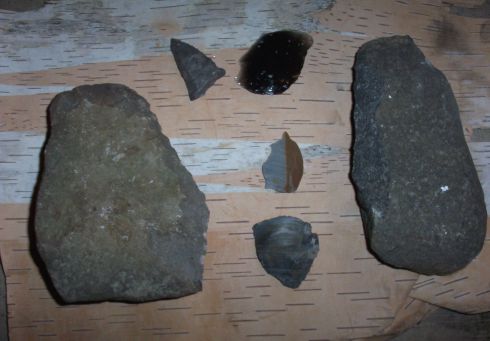 |
Two large choppers, a gouger, and
three carving tools. |
Stone tools can be categorized into the purpose
they will serve. For example, abraders, drills, etc. For a bow-drill you will
need a chopper, abrader, carver, and gouger. The abrader may take the place of
the chopper and the carver. A carver may not be needed if you have a chopper and
abrader. The gouger is not really necessary. You could substitute a piece of
hard wood instead. The following techniques work best with the softer woods.
The chopper is any rock with a fine grain. It
doesn’t have to be a particularly tough rock. It should be shaped roughly like
a teardrop. One end should come to a point and the other end should be a rounded
bulge. Basically the same thing as the ancient hand-axes. The more weight it
has, the better. Of course it shouldn’t be so heavy as to tire you out after a
few chops. It should fit comfortably in the hand if possible. Usually, you will
have to make due with cobbles that are about the right size and flake off
sections to produce a crude blade at one end.
A wide variety of rocks will work. Limestone is
relatively weak, but easily worked. It should hold together on soft woods.
Andesite and other fine-grained igneous rocks, such as basalt, are a good
choice. These will be more difficult to work, especially if all you have are
rounded river cobbles. Cherts and flints make good choppers if you can find
pieces big enough to use. Stay away from rocks that crumble easily, like shale
and sandstone. Granite is generally too coarse-grained although it is worth
trying. Obsidian is way too brittle.
The technique of using hand-axes is simple.
Just smash the section of wood you want to shape. Use a sturdy log as a
workbench. Focus the direction of the blows along the grain of the wood. In
other words, don’t chop straight down. Chop at an angle to the branch. The
effect is to push and pulverize the wood off in the direction of least
resistance - the grain. It isn’t pretty but it works. As you pound the wood,
it will separate along the grain and you will be able to peel off short sections
of the annual rings (also known as splints). Keep pounding hard until you have
gotten through enough to make a controlled break. The angle that the cut will
have will be huge compared to an axe because the blade on the rock must be so
thick to avoid crumbling.
Generally, the only time you need to do this is
for the ends of the spindle. You will need to start with a branch that is
already the diameter you want your finished spindle to be, otherwise it will
take forever to whittle it down.. It must be straight. Make sure the ends of the
spindle taper roughly to points. You will finish tapering the ends with either
an abrader or a carver.
The abrader can be virtually any type of rock.
Obviously, something glassy, like obsidian, won’t work. Sandstone is probably
the best. Gneiss and sometimes granite will work. This is used like you would
use a file. You can also use abraders more like saws if they are shaped right.
The ends of the spindle, the notch, and the ends of the bow can be shaped/cut
using an abrader. For the notch, you will need a thin flake. The ends of the
spindle however, can be abraded against exposed bedrock or a large slab.
Carvers are rocks that hold sharp edges. These
are typically the cherts, flints, and obsidians, among others. These are more
useful as fine-shaping tools. The choppers will produce a quick, messy end that
needs to be cleaned up. Carvers allow very nice whittling to be done, but take
too long for any bulk work. Using simple, hard-hammer percussion, break off some
small flakes from a core and replace when they get dull. Make sure you don’t
twist the flakes as you push them into the wood or they will crumble. Take off
little shavings of wood until you get the shape you want.
Gougers are just any type of rock that doesn’t
crumble easily and holds a rough point. These are just hand-held drill bits. Use
these to start the holes in the handhold and the board. Really, anything can be
used for this, such as antler, bone, or even a piece of hard wood.
|
| |
|
Actually Building and Using
the Set
One way of shouldering the end of the spindle
without a steel knife if to chop just the last couple inches. Instead of
chopping at an angle, chop straight down. This will cause the growth rings to
separate and you can peel them off until the end of the spindle is the diameter
you want.
|
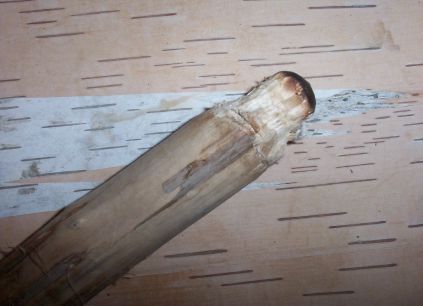
|
The spindle end has been reduced
in diameter with a chopper. |
The bow is made as with a knife, with a few
changes. Since you will not have a thin blade to wedge into the ends to start
the splits you need to do this differently. When you are removing the bow limb
from the tree (remember, it must be green), only cut/abrade/chop half-way
through. Then, carefully split the branch by pulling it away form the cut. Then
cut/abrade/chop through the other half to separate it from the tree. The other
end can be done in a similar way. Make sure you keep in mind the orientation of
the bow and the split. You want the split to be in the same plane as the bow so
make your initial cut accordingly.
|
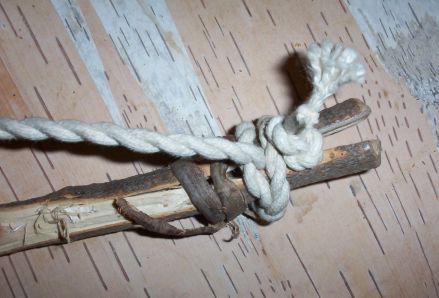
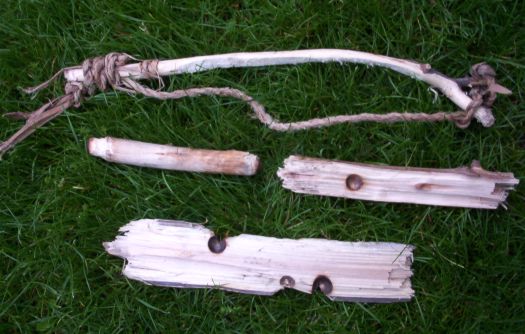
|
Notice the wrap of cordage below
the main bowstring. This keeps the bow from splitting further. The
clove hitch knot is excellent for this application. |
The board should be quite thin, about the
thickness of your pinky. The string will simply not be able to handle the torque
of spinning a spindle in a deep hole.
The notch should not be made too big or the
spindle may pop out. You will probably have to make a new hole and notch each
attempt.
The handhold can be made from one of the pieces
you rejected when trying to snap out a board from a thick branch. The shape of
the handhold is not important, as long as it doesn’t get in the way of the
bow. Don’t bother cleaning up the ends, you just waste time.
Try to make the handhold hole using the rock as
much as possible. Burning both ends of the spindle at once puts a lot of strain
on the string and your arm. Sometimes you can skip the handhold burn-in
completely if the hole is big enough and it matches the spindle tip. Remember,
make the hole nice and deep to prevent the spindle from popping out. Making the
end of the spindle into a fat half-sphere reduces unwanted burning.
If you let the string dry out, you will have a
greater chance of getting a coal. You don’t want it completely dry. It is
almost always easier to get a coal if you let the cord dry out overnight and
then re-hydrate it the next day. That sponginess is thus greatly eliminated.
This may not be feasible in a real situation though.
|
| |
|
Wrap-Up
Putting all the parts together in the forest is
not a simple or easy task. If you cannot find any rocks to use, what can you do?
This is a very real possibility in some places. Also, a covering of snow and
frozen ground pose serious problems if you were to depend on getting a fire from
scratch in a real survival situation. You are looking at an average of half a
day to find and make all the components of a bow-drill set and this is in
favourable conditions! It is much easier and faster to make a fire using
bow-drill if you have a steel knife and some strong cordage to use. Even a
partially-reliable full survival bow-drill set requires many hundreds of hours
of practice to produce a coal on the first attempt, from scratch, in the bush.
Even so, actually being able to give birth to a
coal without relying even one bit on the tools of civilization is a feeling that
hits you like a truck. You are taking the bow-drill to its purest form. There is
a direct communication between the natural materials that went into it and
yourself. It is not something you will ever forget!
|
| |
|
© 2000 Peter Moc
|
|
|
|
|
|
|
|
|
|
|