Home →
Survival →
Hunting →
Bow and Arrow
Making the Bow And Arrow
by Tom Brown, Jr.
For me, there is no greater pleasure than being able to make things for myself instead
of running to a store whenever I need something. Hunting equipment need be no exception. I
believe that the true essence of the hunt is heightened when one must track then stalk the
animal, and further enhanced when the hunter has made his own bow and arrow.
There are numerous types of bows and arrows that can be purchased but none so personal
and fine tuned as one that is made with your own hands. Each bow is different, whether you
use the short and highly reflexed sinewbacked bow in the style of the plains Indians, or
the long recurved bow of the eastern woodlands Indians, or you may incorporate styles, as
the bow you make is very personal. This difference is what makes writing an article on
making a bow and arrow difficult.
I have made many different bows, but through trial and error certain hunting
techniques, terrains, weather conditions, and numerous other variables, I have come up
with the bow that best suits me. By conveying the descriptions of the various types of
bows I use, I hope that through your own experimentation, visiting museums, and field
work, you will be able to use these same methods in creating a bow that fits you and your
hunting technique.
Please keep in mind that I am not discussing the making of a survival bow and arrow
using primitive equipment. Survival bows are of a different technique and design that
allow the survivalist to make a strong bow quickly and one that is used primarily for
close range hunting. What I will be covering are techniques used in making the long term
bows that take much time and effort, not to mention an artistic touch, but will out
perform store-bought bows because they fit you.
I have a few different types of bows to fit my hunting needs. I am a tracker, stalker,
close-range hunter and I prefer a bow that is recurved like an eastern woodland but
smaller, with sinew backing for strength and snap. A small bow is excellent for stalking
through heavy brush and getting close, tight shots. In rainy weather I am forced to use a
longer recurve bow with a plant fiber bow string to resist the dampness. And when I bow
fish, I prefer a long self bow.
In this article I will describe each of the bows, the materials, preparation, and
techniques. I will also cover how to make various arrows to fit the bows you have made,
and describe how to fine tune a bow so that it fits your hunting style and personal touch.
Nothing teaches as well as experience, so jump right in, make a few mistakes, and keep
after the art until you have mastered it. For further reading, I recommend American Indian
Archery by Reginald and Gladys Laubin, published by University of Oklahoma Press, 1980. I
personally feel that this is one of the best books on the market. Laubin has refined his
skill to a level of art that some of us can only dream of achieving.
The best woods for a bow are Osage orange, yew, ash, or hickory. In some areas of the
country honey locust, mountain mahogany, and juniper were used. Generally, the different
woods used by the native Americans were native to the various geographic regions in which
they lived. If one of these woods do not grow in your area, you should be able to obtain
most of these through a specialty hardwood dealer. My preferred bow wood is Osage orange,
then yew, though for the long recurve or long bow I prefer white ash.
When you harvest the wood, you should look for a stave that will be about 5 1/2 feet
long. If you are cutting a tree, look for one that is 2 1/4 to 3 1/4 inches in diameter,
free of knots, blemishes, and very straight. If you are cutting a sapling, it should be I
inch in diameter, 5 1/2 feet long, free of knots, blemishes, and very straight. I prefer
to cut my saplings in February when the sap is down. Remember that the wood is a gift from
the tree and the Creator, and should be taken with respect.
I then season my wood by keeping it in a wood shed until spring and then moving it
indoors until it has seasoned at least one full year. Keep the stave in a cool, dry place
during the indoor seasoning process. Once it is seasoned it is then time to remove all the
bark.
Do not carve away the bark as you would peel a carrot, but scrape it off holding your
knife at a 90° angle. This will prevent you from slipping and
cutting into the wood itself.
| If you are using a sapling, carefully split it down its full length. You may sometimes
get two bow staves from a single piece. I don't trust splitting and would rather carve
away, using a draw knife, until I have my desired thickness. Bows made from saplings will
have a semi-circular cross section when finished.
If you are using a small tree, split it carefully in half, then in half again. Some of
my instructors get four bow staves out of a 3-inch tree but, once again, I do not trust my
second split and usually finish the job with a draw knife. Bows made from a small tree
will usually have a rectangular cross section, or a slightly curved rectangular cross
section. |
 |
After you have made your initial split or have shaped with the draw knife, it is
important that you never carve on the stave again. Carving tends to cross out some of the
grain and makes the bow prone to splitting. Further shaping will be done with scrapers,
abraders, and sanders.
Now you are ready to make your bow. It's a good idea to ask the bow stave what type of
bow it wants to become rather than you making it what you think it should be. In other
words, take into consideration grain, wood quality, and general growth patterns to help
you decide how to shape the bow.
Generally speaking, a wide, thin bow is the best for softwood because it will resist
cracking. I find that softwood tends to splinter a little easier than hardwood bows.
Hardwood bows can be a little narrower and thicker because they are less brittle. If you
are going to sinew-back your bow it makes little difference which one you choose.
When I make my bows, I never rely on tape measures and calipers for I do all my bows by
feel. I have learned to use the simple measurements of my hands. I measure the limbs of
the bow by what feels good to me, and also what feels good for the wood. Everything I do
is by touch, eyesight, and inner feeling. The dimensions given in this article are by no
means law, but just a list of averages to help you in making your first bow. After you
have made a bow or two, you will begin to rely on your inner feelings and eyesight
measurements, thus producing the bow that is as personal as your picture.
The Long Bow, Self Bow, or Straight Bow
No matter which name you use, they are all generally the same style and made in the
same manner. The same techniques for making the long bow will apply to the beginning of
all other types of bows, no matter what the shape or finished design. Keep in mind also
that a bow can be made by splicing two staves of wood together where the handle will be,
but that technique is not my preferred method.
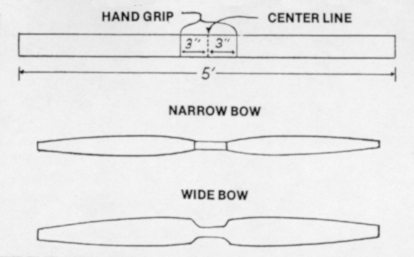
The first thing I do is to decide what type of bow shape I want to make. Is it going to
be wide and thin, or narrower and thick? Next I find the center point of the bow and from
the centerline measure out 3 inches to one side and 3 inches to the other.
In this article I will be discussing a bow which is 5 feet long and made from ash. You
may make them any length from 3 1/2 feet long to over 6 feet long, depending on your
preference. The stave will be 2 1/2 inches wide and I inch thick.
Once I have marked off my hand hold area and know my general shape, I then begin to
thin out the limbs of the bow. Starting from the outside of the hand hold lines and using
a bastard file I begin thinning and tapering the bow from about a 5/8 inch thickness near
the handle to a 3/8 inch thickness at the tip. What I am trying to achieve is a smooth,
even tapering. The width should also be slowly tapered from 2 1/2 near the handle to 1/2
inch at the tip. Take care not to get carried away and try to taper the limbs like a
storebought fiberglass bow, as this will give you a lack of strength (see illustration).
The back and sides of the bow should remain as flat as possible.
I then begin to work the handle and this becomes a matter of personal preference; in
order words, what feels good to you. The handle has to be thinned in width and in
thickness until it fits your hand comfortably and also allows you room to place the arrow.
I never put an arrow guide or ledge on my bow as I prefer to use my hand as most native
Americans did (see illustration).
Once the handle is comfortable and all the lines and tapers are relatively smooth, it's
time to finish off the bow with a finer file such as a mill file. Then the bow should be
tested to see if the limbs pull evenly. This is accomplished by tying a string to the
ends, placing your foot on the handle of the bow and pulling upwards slightly. Be careful
not to pull the ends up more than an inch as this may only cause splitting if the limbs
are not even. If you find that one limb pulls easier than the other, carefully abrade away
the belly of the stronger limb, using a small mill file until they pull evenly. Once you
have made the preliminary adjustments, sand the entire bow smooth.
To finish the bow, it must be oiled with fat or brains to keep it supple and
semi-waterproof. The native Americans used bear or deer fat that had been rendered and was
applied warm. Deer brains were also used after being warmed up slightly, as you do in
brain tanning of leather. The bow was then set close to a fire to warm the fat and drive
it deeper into the wood. My personal preference is to mix rendered fat and deer brains and
apply the mixture warm, then set high above my wood stove to drive in the oils. Once this
is done, the long bow is ready to shoot, but go easy at first. Sometimes, no matter what
we do, the bow will snap, through no fault of ours but because of inconsistencies or flaws
in the wood. There is nothing more to do but try again.
Later in this article we will be discussing the sinew-backed bow. Sinew can also be
applied to this bow using the same method. The sinew will keep the bow from breaking,
improve the snap and cast, and add pulling pounds to the bow. I suggest very strongly that
all your bows be sinewbacked, which will increase its longevity.
Recurved Bow
To add more snap and cast to your bow and make its performance more volatile, you may
want to add a recurve to your bow. This is quite easily accomplished and adds tremendously
to your bow's performance.
Make the bow as you did when you made your long bow and stop just before you put on the
fat and brains, the usual finishing process. What you are going to do now is bend in the
recurves at the ends of the bow, usually the last 6 or 7 inches.
Using a pot of boiling water, immerse one end of the bow, up to about the 9 inch mark,
and let it sit for 2 1/2 to 4 hours. I use my wood stove and add humidity to the house at
the same time my bow is cooking. While the bow end is in the water, I cut out a curve
pattern on a 2 x 4 piece of scrap lumber (see illustration).
Once the bow end is removed from the kettle, I then place it onto the form and clamp it
down. The best way to accomplish this is to clamp the tip of the bow first, then using the
bow as a lever, slowly bend the bow back over the form. The finished set will be clamped
in two places and it is a good idea to place a small square of wood between the clamp and
bow to keep it from getting dented.
At that point, when the one end is clamped, I begin to boil the other, repeating the
whole process. I then allow the bow to dry for a day in a warm, dry place.
The next step is to remove the clamps and fine-tune your bow. This is accomplished by
removing a little of the belly wood just before the recurve. I usually take off 1/16 to
1/8 inch of wood from the curve to 6 inches back. I find that by doing this the bow has
better snap with very little jolt. Some authorities say that it also keeps the recurve or
ears from snapping off. (Please keep in mind that the tips curve out over the bow back.)
Once your bow is fine tuned, you can either sinewback it or finish it up the same way you
did the long bow.
If you want to go further, you can add a reflex to your bow by simply bending the back
of the bow at the center. Heat the center of the bow over a steaming kettle for two hours
or more, lay the back over a small log, and stand on the ends until cool. This will
produce a back curve or reflex, adding even more cast and snap to your bow. This should be
used if you are making a bow short like the plains Indian bows (around 40 inches long).
Sinew-backing Your Bow
As I mentioned earlier in this article, sinew-backing can be done on any bow and it
will improve the bow's performance, longevity, and prevent breakage.
The two necessary ingredients needed to sinew-back a bow are sinew (the leg and back
tendons of animals), and hide glue (the glue made from hide shavings and hooves of
animals).
I prefer the leg sinew of deer or elk, but I have found horse, goat, and moose sinew
just as good. To obtain the sinew, simply remove the sinew (tendon) bundles from the leg
and back of the animal. If you aren't a hunter, contact your local animal rendering
service or slaughterhouse and arrange to buy some. Usually they will just give it to you
and be convinced you are strange.
Prepare the sinew by removing the clear sheath that holds together the bundles and set
the bundles high over your stove to dry. When dry, pound the bundles with a wooden mallet
or soft rock over a board anvil. This pounding process breaks apart the bundles into fine
threads of various lengths.
To prepare the hide glue, put bits of rawhide, hooves, hide scrapings, and chopped dew
claws into a pot of water and boil for several hours. You may want to skim off the oils
and debris that bubble up on top to give a finer consistency. After several hours of
boiling you will end up with a thick, gooey mass called hide glue. Another alternative is
to buy commercial hide glue at your local hobby shop and try that. I prefer to make it
myself, as store bought lacks the aesthetic value of homemade.
I first prepare the back surface of my bow by scoring it with a hard abrasive rock.
This gives the sinew plenty of nooks to seep into and take hold. I then paint the bow back
with a light mixture of hide glue and water (preferably distilled water). If you feel that
you may have gotten hand grease on your bow back, you can lightly sponge it off with a
detergent and water mixture, then let dry. Next apply the hide glue/water coating.
I keep my hide glue in a water bath on the stove so that it is hot to the touch. I find
that if it is at room temperature, it works gummy and sets up too fast. I also find that
the drying time varies. I first wet the sinew then place it into the hide glue to soak, a
few strands at a time. Starting at the center of your bow and working outward, place on a
strip of glue-soaked sinew evenly. The glue should not be oozing from the surface of the
sinew but pressed out between your fingers when removed from the pot. Make sure that you
stagger your sinew application, especially when using short leg sinew, to avoid any seams.
Make the sinew application took like a mosaic, even, and cover the entire back surface of
the bow with the sinew glue mixture. I keep applying sinew all the way to the tips, then
over to the belly side for about 2 inches. Once the bow is sinewed, I stop and let it dry,
and then put on 2 or 3 more coats. I then let the entire bow dry for 3 to 6 weeks.
Some people apply powdered clay as a final coat, or even powdered sea shells, but this
is mostly cosmetic. Some people even apply glued rawhide to the belly for cosmetics, but I
am a naturalist and am not looking for cosmetics. These practices do aid in preparing the
surface for painting if you are so inclined.
After the bow is dry, I shoot it a few times at half draw to see if I need any more
fine tuning. If you find that you need more off the one limb, simply file it away. Sinew
can be worked with a file also.
Finally, the bow is finished with a rendered fat or deer brain's mush the same way as I
described for the long bow. This time, however, I do not place the bow near the fire for
deep penetration. Some native Americans would finish their bow by glueing on a snakeskin
to further protect the bow from weather. Always oil your bow twice a year to keep it in
good shape.
As time progresses you will find that the sinew continually pulls against the belly of
the bow, producing a backward curve. Usually, after a year passes the sinew will have
pulled all it is going to. So expect it.
Bowstrings
Bowstrings are made using the reverse-wrap method of making cordage that I described in
Mother Earth News Volume 79, 1982, only you will be using sinew in most cases. For bow
string, what I do is a double-reverse wrap. By reverse wrapping more than ice the length
of the bow, then loading the cord in half again and reverse wrapping it, you will have a
very strong and durable bow string. . Plant fibers can also be made into bow strings the
same way, but they are pot as good. Plant fiber bow strings, however, will not stretch
like sinew bow strings in foul weather. Velvet leaf, dogbane, and nettles make good bow
strings for wet weather purposes.
Arrows
Now, to go with your self-made and very personal bow, you are going to need arrows that
are just as personal. Cherry, service berry, cane, reed, ash, dogwood, cedar, and high
bush blueberry are some of the best woods to use for an arrow shaft. Select 1/2-inch
diameter 3 foot shafts from straight saplings that are virtually free of knots and
collected during the winter, when the sap is down.
Bundle the saplings together into tight bundles, tied every few inches, and season the
same way you did for your bow. Reed and cane should be collected at the end of the growing
season, just after they turn brown. Reed should be spread out flat to dry and not bundled.
(More about reeds and cane later on.)
After the shafts have seasoned, scrape off the bark the same way you removed the bark
from the bow stave, by scraping and not carving. For a 5 foot long bow, arrows are cut and
measured from the tip of your fingers to the arm pit about 30 inches. For a shorter bow
your arrows will be about 25 inches. Smooth the shafts down to 1/4 or 5/16 inches in
diameter using coarse sandpaper and working down to a fine grit sandpaper or emery cloth.
Once smooth, grease the shafts with rendered fat and let them heat by the fire to drive in
the oils.
The shafts are then straightened, simply by heating them by the fire and bending them
straight at the curves until cool. Sometimes it is necessary to use an arrow straightener
for stubborn curves. An arrow straightener or arrow wrench is made by drilling a hole
through a deer antler that is just a bit larger than the diameter of the shaft. The
straightener is used by placing the hot arrow through the hole and using the antler like a
lever to bend out the curves. But be careful to select the straightest shafts you can find
to prevent straightening trouble. The finished product will be as smooth, straight, and
dowel-like as a store-bought shaft.
The next step is to fletch the arrow. I find that a 6-inch long fletching, trimmed to
1/2 inch in height is ideal, and very closely resembles the native American type of
fletching. For this turkey tail feathers are the best, though in a pinch any tail feather
from a medium to large bird will do.
Carefully cut three fletches from the tail feathers by cutting along the median line of
each feather. Carve away the pitch and crop the feather. This
is a good time to trim the feathers to the proper height so that they are all the same
size and shape.
The fletches are carefully held in place on the thicker end of the shaft, and the front
is wrapped tight with leg sinew. Some people temporarily hold the feathers in place with a
pitch or diluted hide glue to free the hands. Sinew is applied by first preparing it into
threads, as you did for your bow back, then wetting with saliva. The sinew is then wrapped
on evenly and snugly. The saliva and sinew method forms its own glue and does not have to
be tied. This wrapping is almost transparent, lays close to the shaft, and tightens up as
it dries.
The back of the fletching is wrapped up to the base of the nock location. I then abrade
in a U-shaped nock with a small rat-tail file until it ends on the top fletch sinew wrap.
This way, the nock is supported by the sinew and prevents the string of heavy bows from
splitting the shaft. Take care that you knock in at the proper position to allow two
feathers to pass the bow side evenly in flight.
Arrow tips vary with location, laws, and terrain. A survival arrow tip can be made of
fire-hardened wood, bone, antler, stone, or metal. In my state it is illegal to hunt with
anything other than a razor steel broad head. Steel heads are easily cut out with a jig
saw and filed to sharpness. Take care to make the proper base so that the arrowhead can be
firmly wrapped onto the shaft, and small enough so as to not weight down the tip of the
arrow.
Bone arrowheads can be made almost as sharp and as deadly as steel
broadheads, and the
same shape. just use the cannon bone from a deer; split, and file to shape and sharpness.
Stone arrow heads can be made from flint, chert, jasper, quartz, obsidian, and even
glass. This method of stone working and knapping would take a whole other chapter to cover
and cannot be treated in the. scope of this article. However, stone heads can be just as
sharp and deadly as steel when made in the proper way.
Reed
Reed shafts are made virtually the same as hardwood shafts with the exception that they
have to be cut specially. Cut the nock end about 1/2 inch from the joint and insert a
small wood plug that will be filed to hold your nock. The wood shaft can be glued in place
or sinewed. The head end is cut 2 inches from the joint and a 4 to 5-inch wood shaft is
sinewed or glued into the reed, buttressing up against the joint on the inside. The
overall length of the arrow will vary according to your bow size, the same as a wood shaft
arrow, and they are both fletched, nocked, and pointed in the same way. (Reed shaft arrows
are the lightest and fastest arrows I have ever seen.)
 |
Conclusion I have not gone into the history of bows nor into much detail about the various bow
styles of the native Americans. The styles, type of woods used, and arrows are as varied
as each tribe. By no means believe that the native American archer was primitive, but
rather highly sophisticated and accurate.
Before the white man and his tools, the native American painstakingly abraded away and
sanded his bows with stone tools or scraped with bone and flint chips. The finished
product was just as beautiful and serviceable as any bow and arrow made with modern tools.
Certainly, the process took a lot longer, but time was not important to the Indian. |
Bows also have a background in Europe, China, and, of course, the famous Turkish bows,
and it is probably one of the most effective hunting tools the world has ever known. Bows
are silent, accurate, and test the hunter to his full skill and allow him to reach his
fullest potential as a person well equipped to manufacture his own equipment. A nice skill
to have when prices are soaring, especially on the hunting market.
I believe that bow hunting, with a homemade bow, brings that hunter closer in harmony
with the natural world.
From The Tracker magazine, 1984,
published by the Tracker School.
For more articles from The Tracker magazine, visit the
Tracker Trail website.
For more material by and about Tom Brown Jr. and the Tracker School
visit the Tracker Trail
website.
|