|
Back in MOTHER NO. 71,
wilderness survival expert Tom Brown 7r. (known worldwide as
The Tracker) showed us how to construct the leaf hut-an
expedient and reliable short-term survival shelter. In this
article, the ninth installment of The Tracker's ongoing
wilderness survival series, Tom discusses the basics of
building two different long-term survival
shelters.
 |
| A
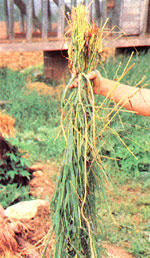
thatch "shingle" made from a bundle of long-stemmed
grass wrapped together at the root ends with cordage
. |
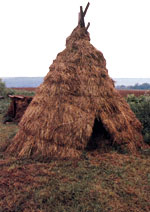 |
| A tipi-shaped thatched hut such as this can be
built in a day and can accommodate an elevated sleeping
loft and provide two adults with spacious three-season
shelter. |
 |
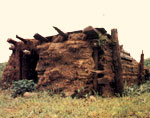 |
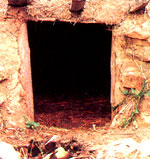
| The author calls mud huts like these "the finest
survival shelters I know of". His favorite style is a
lean-to with a roof that slopes down to the ground at
the rear. |
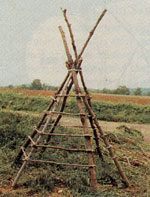 |
| The basic framework for a thatched
hut. |
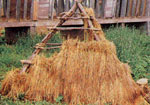 |
| Thatched bundles are installed from the bottom up
in overlapping rows, much like roofing
shingles. |
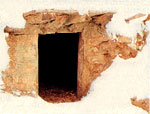 |
| When constructed properly, a mud hut can be a
reliable year-round dwelling in any climate. Cool in
summer and warm in winter, the structure will withstand
rain, wind, and heavy snow. This "earth shelter" hut
provides survival living at its
finest. |
With many hunting seasons opening
in the coming months, a lot of individuals—some of whom have
had very little wilderness experience—will be taking to the
woods. Unfortunately, a few of them will also become lost or
be stranded by inclement weather. Should you be faced with
such a wilderness survival situation, your first course of
action should be the construction of a temporary shelter—such
as a leaf or debris hut—that will keep you warm and dry and
that can be erected quickly, with a minimum expenditure of
energy and natural materials. Only after that basic shelter is
up—and your
other pressing survival needs (water, fire, and food) have
been taken care of—should you consider building a larger, more
permanent and comfortable wilderness home.
Of course, if luck is with you, you'll
never need to erect and occupy either of the two long-term
survival shelters I'm going to talk about in the following
paragraphs. But if you ever should find yourself stranded in
the wilds for an extended period, knowing how to construct a
shelter that will not only keep you warm and dry but also
provide ample living and work space could brighten your
outlook considerably—and by doing so, increase the likelihood
of your surviving until you're rescued.
Neither of these advanced shelters
requires any construction tools other than those you can
fashion yourself, and no materials other than those provided
by nature. Also, once erected, either style of shelter should
be habitable for several years if kept up. In fact, if you
have access to a privately owned woods (your own or a
friend's), you might want to build a "practice" survival hut.
It could serve as a storage building or even a primitive
hunting camp or blind; it'll cost nothing to erect, will blend
in with its natural surroundings, will be relatively easy to
construct, and—most important—will provide invaluable hands-on
experience that will stand you well should you ever wind up in
a true long-term survival fix.
PLAN BEFORE YOU BUILD
No matter what type of shelter
you're building, long-term or temporary, locate it on a
well-drained, elevated site that's at least 50
yards from any body of water that
could rise and flood you out. And while it's beneficial to
have your shelter shielded from the elements by such natural
windbreaks as large trees and rocks, don't place your survival
home so deep in the forest that sunlight can't get through to
warm and brighten it. Finally, consider the availability of
construction materials and other survival necessities (such as
water) before deciding on a building site; hauling materials
in from long distances is a waste of time and—more
important—precious energy.
THE THATCHED HUT
Thatched huts are commonly used as
year-round dwellings in tropical and semitropical climes, and
can offer satisfactory shelter for spring, summer, and fall living in
temperate zones. If properly constructed, these seemingly
fragile structures can withstand high winds and prolonged
downpours and will provide excellent protection against the
heat of the baking sun.
The only possible skill-related obstacle to building this shelter—unless you always
carry some type of rope with you—is that the hut's
construction requires several yards of cordage (that
is, any rope, cord, or twine fashioned by hand from natural
materials) or long strips of inner bark from certain types of
trees. (See my article "Making Natural Cordage" in MOTHER N0.
79 to learn this important survival skill.) Once the cordage
is at hand, however, a thatched but goes up in as little as a
day and can last several years if properly maintained.
I prefer a tipi-shaped but that's tall
enough to accommodate an elevated sleeping loft; it leaves
plenty of room on the ground floor for storage, working, and
moving around. For two adults, the optimum size for a
tipi-shaped thatched but is nine feet across the base and ten
feet high. While long-stemmed grasses make the best thatching
material, reeds are also excellent—and cattails, ferns, and
evergreen boughs will suffice if nothing better is available.
To construct a thatched hut, locate
several long, stout saplings that can be placed upright in a
typical tipi shape. These upright saplings should be strong
enough to hold your weight (you'll have to climb on them
during construction) when their butts are spaced evenly around
the diameter of the hut's base. (I recommend sinking the butts
a few inches into the ground to increase the structure's
stability.) Before standing the poles up, lash their tips
together by wrapping them with cordage where they will cross
at the apex of the tipi (Fig. 1).
The next step is to
weave parallel hoops of long, flexible saplings horizontally
between the upright tipi poles to form a latticework,
securing these crossties to the uprights with square-lashed
cordage (Fig. 1, Inset A)
The first (lowest) round of
horizontal crossties should be located no more than a few
inches above the ground, with subsequent rounds spaced at even
intervals up the tipi poles. To insure that the overlapping
rows of thatch will provide a proper shingling effect, the
vertical spacing of the crossties should be no more than half
to two-thirds the length of your thatching material. (For
example, if you'll be thatching with bundles of grass that
average 18" long, the horizontal cross-ties should be
positioned at 9" to 12" intervals up to within a few inches of
the top of the hut.)
To provide for a door, omit enough rows
of crossties between two of the uprights on the east-facing
side of the hut—beginning with the bottom round—to form an
entrance hole just large enough to crouch through.
The final frame members to be put in
place are several sturdy poles (rigid, large-diameter saplings
do nicely) that will act as floor joists to support the
sleeping loft. Since they'll have to support your weight, the
loft joists should be securely lashed directly to the uprights rather than laid atop a
round of crossties. For loft flooring, you can use overlapping
sections of heavy bark, or make a mat of smalldiameter poles
laid side by side and perpendicular to the joists and lashed
in place with cordage.
THATCHING
To make a thatch "shingle," gather
up enough long-stemmed grass to make a bundle that's a little
too fat to hold in one hand. Now turn the bundle so that the
root ends of the grass are facing up, and "belt" it with
cordage about a quarter of the way down from the top. Wrap the
cordage tightly enough to form a waist in the bundle, and tie
it securely—but leave enough line dangling from either side of
the knot to secure the bundle to the framework of the but
(Fig. 1, Inset B).
Once you have a quantity of thatch
bundles made up, tie the first one—root end up—to the bottom
crosstie and snug it alongside the nearest upright. Attach the
second bundle hard against the first, and continue in this
manner until you've thatched the lower crosstie all the way
around the but (except for the door opening). Now begin
thatching the next cross-tie up . . . then the next (using the
framework as scaffolding), until you reach the top of the
tipi. The critical point to remember is that the bottoms of
the thatch bundles in each higher row should overlap the tops
of the bundles in the row just below it—exactly like shingles
on a roof.
The uppermost round of thatching will
form a bushy cap at the top of the tipi. To make this cap
watertight, tie the tops of the uppermost layer of bundles
together with cordage. To further waterproof the crown, you
can lash several more bundles of thatch over the
top at different angles.
Now, with your outstretched fingers, go
over the thatching inch by inch, working the bundles of grass
until they intertwine and lay flat to provide a wind- and
watertight surface.
The entrance hole can be draped with
animal hides, or a door fashioned by lashing bundles of
thatching to a stick framework.
The final step is to reinforce the entire
shelter by spiraling cordage down from the top to hold the
grass bundles flat against the framework and to prevent them
from flapping and separating in high winds (Fig. 1, Inset
C).
THE MUD HUT
The mud but is one of the finest
survival shelters I know of—because it's suitable for
year-round habitation in any
climate. Wind doesn't make it shake, it's strong enough to
stand up under heavy snow loads, it tends to be warm in winter
and cool in summer, and it's easy to maintain.
What's more, because a fireplace can be
safely built inside this shelter, it's especially well suited
to riding out severe winters in relative comfort. You can
design and build a
mud but in just about any shape you can dream up, and
make it as large or as small as you want, but my favorite is
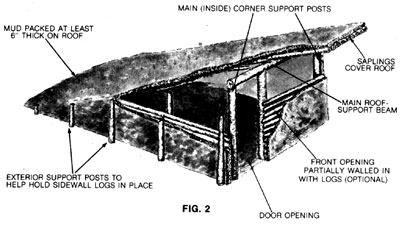
what I call the mountain man style: a lean-to with sides, a door on the high end,
and a roof that slopes back and down to touch the ground at
the rear of the shelter (Fig. 2).
The load-bearing members of the but are
rocks and logs, but the material that holds it all together is
mud. Not just any old mud, though; you want the thickest,
gooiest muck you can find. You can make your own by mixing
clay-bearing soil and water, but it's better, if possible, to
locate your shelter near a natural deposit of muck (common
along the shores of lakes and slow-running streams and in
swampy areas).
In addition to logs, rocks, and mud,
you'll need a good supply of dried grass to mix with the mud
as a binder.
Begin construction by cutting several
very sturdy poles to serve as the uprights that will support
the roof and act as a framework for the sidewalls. Doing the
best you can with the tools you have available, sharpen the
thinner ends of the uprights and cut V notches in the butt
ends. (If you can locate enough of them, forked poles—with the
tines facing up—make the best upright supports.)
Now drive the sharpened ends of the
uprights a foot or so into the ground; the two thickest and
tallest poles should form the front corners of the lean-to,
with additional uprights spaced down the sides of the
structure. (The exact number of vertical supports you'll need
will be determined by the size of the hut.)
A single horizontal log beam spans and
rests atop the two tallest (front) uprights. Since this beam
will have to support the considerable weight of the front of
the roof, it should be hefty and should be lashed firmly in
place to the notched (or forked) tops of the uprights.
To fabricate the roof, lay small logs or
stout saplings side by side and parallel to the hut's
sidewalls—their tips jammed into the ground at the back
(lower) end of the lean-to, and their butts overhanging the
front roof beam by at least several inches (the more the
better, as this overhang will help shield the door opening
from sun, rain, and snow). If you have plenty of cordage
available, lash the roof poles together, as well as to the
uprights at either side and to the crossbeam in front.
The sides of the mountain man but can be
built up (that is, filled in) with either rocks or logs—and
here's where the going gets muddy. Start by preparing a muck
pit: I find that two parts thick mud to one part dried grass
provides a good general-purpose mortar. When the mud is ready,
mound up a row of it on the ground where the first sidewall is
to go, then press the first log (or the first row of large
rocks) firmly into the mortar. Now spread another layer of
mortar along the top of the log (or rocks) you just put in
place, and lay on the second log (or the second layer of
rocks) . . . and so on until both sides of the but are
enclosed all the way to the roof. Because of the triangular
shape of the sides, the logs (or rows of rock) will get
shorter as the walls rise.
If you're siding with rock, the walls
will be stronger if they're made thickest at their
bases, narrowing as they rise. If you're siding
with logs, stack them up and mortar them in place snugly
against the outsides of the upright support poles—then pound a
second row of uprights into the ground just outside the
horizontal logs so that each wall is sandwiched between two
rows of uprights.
Finally, coat the exterior and interior walls with a heavy layer of mud to
seal any cracks . . . and pack it at least six inches thick on
top of the roof to provide weatherproofing and insulation. (If
you build your but in the spring or early summer and cover its
mud top with a few inches of loose soil, the roof will
probably grow a matting of grass and weeds, increasing its
durability significantly.)
A mud shelter will require several days
to dry thoroughly, depending on the weather. Surprisingly,
though, rain doesn't seem to slow the drying process to any
extent or to wash away much of the mud.
HUT HEAT
A covering for the open front of
the mountain man but can be fashioned by suspending animal
hides from the top of the opening—or you can enclose most of
the front with mud and logs or rock, then make a sturdy door
for the remaining opening by lashing together several large
saplings or small logs cut to length. (If you have no tools,
you can "cut" logs by burning them in a campfire at the
desired point of separation, then hacking at the charred wood
with a large, sharp-edged rock.)
To take care of your heating and cooking
needs, you can use rocks and mortar to construct a fireplace
and chimney—which can be built on either the outside or the
inside of the structure. An external fireplace necessitates
cutting a hole through one wall at floor level, while an
internal fireplace takes up living space and requires cutting
a hole in the roof for the chimney.
AT HOME IN THE WILDERNESS
The thatched tipi but and the
mountain man mud but are but two examples of the many ways you
can make yourself more at home in the wilderness. In practice,
there's no limit to how well you can care for yourself in a
survival situation—if you'll only accept the responsibility of
gaining the necessary knowledge and skills now,
before you need them.
For more material by and about Tom Brown Jr. and the Tracker School
visit the Tracker Trail
website.
|