|
Materials & dimensions: I used white ash for
the poles and walls, because there is a stand out back that is young
growth, and way overcrowded. The diameter of the yurt is 11½
feet across, the walls are about 40" high, the wall poles are 48" long,
but lose height when the wall is opened to build, it becoming a series
of X's. The roof poles are 8 feet long, there is an 18" overhang for a
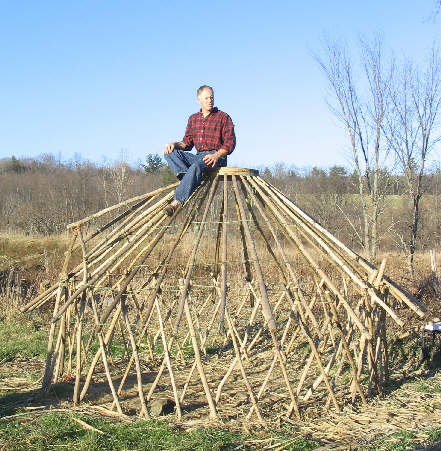
drip edge. The doughnut in the center that I'm sitting on is 30"
across, with 6" width of wood 3" thick (pine). I used whatever scrap
boards I could find, sandwiched them together in an overlap pattern,
drilled and pegged them together, and cut an inner and outer circle.
There is a 20" wide smoke hole in the center, I'm sitting on the edge of
it in the picture. All the poles were peeled while the sap was up, so
the bark came off easily, or else next year powderpost beetles would
bore holes all thru the wood if the bark were left on. A 1" auger was
used to drill the 26 holes in the doughnut for the rafters to fit into.
The top 2" of the poles were shaved down to 1" for a snug fit. There are
52 wall poles, The wall poles have three holes drilled in them, one in
the center, and one each a few inches from the end.
Rawhide was traditionally used, so that is what I used, though nylon
cord would work fine and last longer. Do not use commercial rawhide; it
is too weak. I had a few strips from an old dog chewy that I wanted to
use up before cutting up a deerhide. Pulling it tight thru the drilled
holes in the poles, would cause it to break, and after drying it became
brittle and tore.
All the roof poles have a hole drilled in them, 6' 6'' from the
narrow end that goes into the drilled holes in the compression ring. A
small rawhide loop is tied on here to attach to the top of the "X" in
the wall.
Setting it up:
The wall is in two sections (it's easier if you have a person to
help, but I did it alone). Drive a 4' stake in where the door will be to
support the wall, till the door frame is installed. Tie one end of the
accordion wall to the pole, then walk away, feeding out the poles as you
go, in a half circle. When you get to the far end, have a 6 foot forked
branch to support the wall from falling down, or drive in another stake
and tie it to it. Drive in a stake on the other side of the doorway, tie
the other half of the wall to it and expand it, tying the two walls
together where they meet. Install the doorway. I made mine arched, about
5½ feet tall. You can then remove the poles
driven into the ground. Adjust your walls so they are round and the size
you want, and evenly spaced. Install the compression ring, which is
cordage. I used baler twine that was reversed wrapped. Without the
compression ring of cordage to keep the walls from blowing out, the
shelter will collapse. The cordage goes all the way around the outside
of the walls, and ties to the doorway.
Get three of the roof poles, and the doughnut. Spacing the poles to
be equidistant, put in two poles on the doughnut and loop the bottom end
on the wall. Put the third pole into the wooden doughnut, lift it up,
and loop the third pole onto the wall -- the smoke hole is now in place.
Put the rest of the poles into their places, on top of the X's on the
wall, and the frame is complete.
As you can see from the photo, the structure is plenty sturdy enough
to support my weight. I covered the yurt with reed mats (made from
phragmites reeds). Traditionally felt mats were used; most folks use
tarps today. Traditionally, a long term shelter was about 15 feet across
-- large enough for a family to live in. I made mine smaller, so it
would be more mobile.
Sorry, no more pics, this was taken as the shelter was going down.
--Walt |