A Wildwood Survival exclusive - featured on Mythbusters (but it was here they got the idea).
And many other places on the Internet. Wildwood Survival is the original source
of this concept.
Page and photos by Walter Muma, with
some input from others. Copyright by Walter Muma
This article and photographs may not be reproduced without permission
Here you will find a lot of info about
wilderness
survival and related topics.
After you are done reading about how to make fire from a can of coke
and a chocolate bar, please take some time to look around.
There are quite a few unusual methods of
making fire described on this site, such as Fire from Water, Fire from Ice, Fire from Two Stones, and
much more!
Yes, you CAN make a fire from a can of coke and a chocolate bar!
It really does work -- there are emails at the
bottom of this page verifying
this.
This idea was originally proposed by Andre Bourbeau to
Rob Bicevskis about 6
years ago. I don't know if he is the one that came up with it in the first
place. But thank you to Rob for bringing this method to my attention. The original
concept was to investigate unique and unusual ways of making fire using
everyday objects that one might be carrying around, should one be
unexpectedly stranded
in the wilderness. Of course, prudent hikers will probably be carrying a
lighter or matches! :)
To make fire from a can of coke and a chocolate bar is actually
quite easy, and you don't need any tools.
However, you do need some sunlight and some
tinder when you're actually ready to start a fire!
For the doubters reading this page, at the bottom are comments from people
who have actually done it. In addition,
Rob Bicevskis, who passed
this concept on to me, has done it. It's his hands you see in the demo
farther down the page. Please also see his article, "Fire by Cans, Part II".
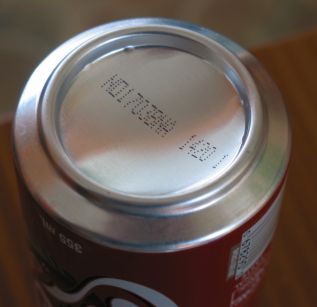
The key to this is the bottom of the coke can (by the
way, any pop can will do), which is
ideal for reflecting and concentrating the sun's light and energy.
Here is a photo of a coke can bottom. Note that it has a
slightly dull finish. In its present condition it is not shiny enough
to concentrate the sun's rays enough to ignite tinder.
That's where the chocolate bar comes in ....
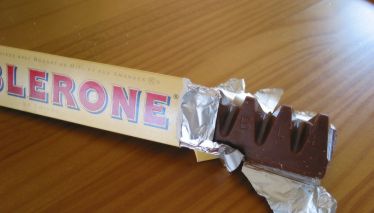
The chocolate bar....
The can bottom is not shiny enough to function as a good reflector
and concentrator of sunlight. It needs polishing. The chocolate does an excellent
job of this. So, simply break off a piece of chocolate and use it to
polish up the can bottom!
P.S. Any type of chocolate will do. Probably the purer it
is, the better. In that case, maybe a Toblerone bar isn't so great, as
it has nuts and honey in it.
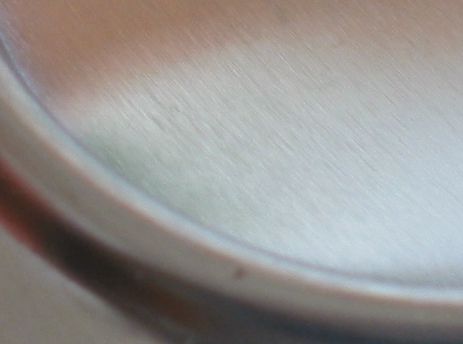
This is a close-up of the surface of an un-polished can's
bottom. Note the fine straight lines in the aluminum.
These fine lines on the unpolished can
are actually the grain of the aluminum roll stock from which the can
is made, indicating a small degree of surface
roughness which limits the can's reflectivity. These scatter
the sun's rays, and prevent them from being focused together into a
single bright point.
This is why the can needs polishing.
Compare this to the picture below of a polished can
bottom.
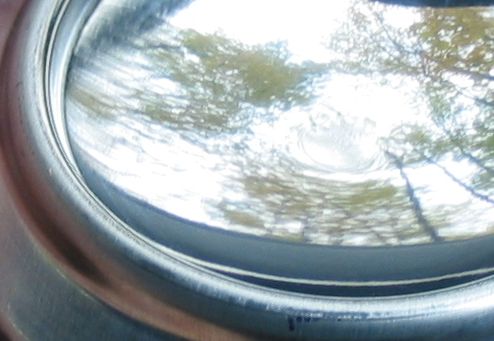
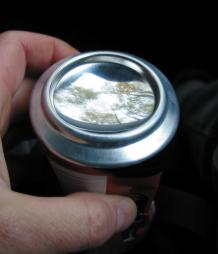
Here is a close-up of a polished can bottom.
Compare this to the picture above of an un-polished can
bottom. There's a big difference.
How can you tell when it's polished enough? What you
are looking for is a "mirror" finish. An object placed near the
bottom of the can should produce a clear (although distorted) image.
A note from A. Robinson, via email:
"DO NOT eat the chocolate after you have used it to polish the
can! It will pick up aluminum from the can, which is toxic. I've done
metalwork with aluminum, and you're actually supposed to handle it with
gloves, since it leaves a black toxic residue on your skin. Once it has
been exposed to air for a few hours, aluminum is safe to handle because
it forms an oxide layer on the surface which is non-toxic. But polishing
it will remove the oxide layer and expose bare metal, and the chocolate
will definitely pick up some aluminum. Not a mortal danger, but not the
best thing in the world to eat!"
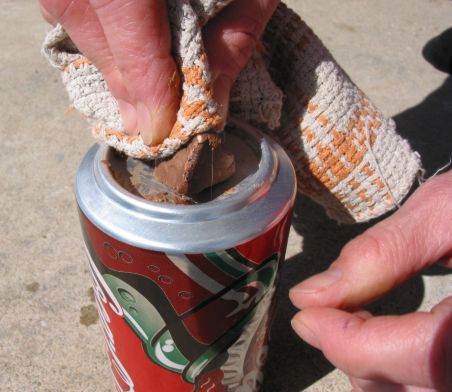
Polishing the bottom of the can.
Note: For polishing the can, one needs to
use the wrapper (or something else) in the process. Just rubbing chocolate on the bottom
of the can won't do too much. The process is to smear some chocolate
on the bottom, then use the wrapper (or whatever) as a "cloth" to do the
polishing. Every now and then, one needs to add a bit more of the
"abrasive." As a reference point, it will probably take ½-1
hour or more to finish the process.
Toothpaste also works as a
good polish.
Using the chocolate bar holds to
the initial challenge - but using fine steel wool, some sort of
cleanser or other polishing compound gives much more rapid results.
Jeweller's rouge will get the bottom of the can
to a mirror finish in a few minutes. Chocolate at best would take
an hour!
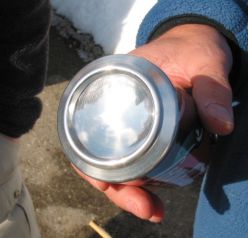
All polished and shiny.
Note that other polishing agents will work as well, such as toothpaste,
powder cleansers, etc.
How to actually make fire...
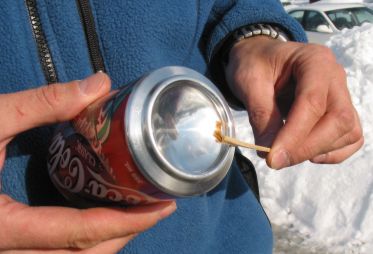
On a sunny day (yes, you do need sunlight!), Hold a piece of suitable tinder, such as a fragment of tinder
fungus, at the focal point of the can bottom -- about 1 -
1.25" away from the center of the "bowl".
One doesn't need to use tinder fungus. To
keep to the core of the challenge, one can use pieces of the chocolate
wrapper to get a coal. If the chocolate bar has a black paper insert,
this is of course the best due to the dark colour. It takes a bit
longer with the wrapper - but, as with a magnifying glass, many things
can be used.
It is important to orient the bottom of the can towards the sun. If the
bottom of the can is "off-axis"
from the sun, then the the light gathering will be less optimal.
To make
sure that you are finding the optimal focal point, try using some black
newspaper. Take a small strip, and move it towards the focal point. As you
move the paper in and out, you should be able to see the light converge to a
small point. At this time, the newspaper should start to smoke. Wearing
sunglasses is suggested.
It protects the eyes and also reduces the intensity of the light so that it
is easier to identify the sharpest focus.
CLICK HERE for more info and photos of how to do this.
Holding the small piece of tinder
fungus is easier with a long thin stick with a small split in the
end, such as is shown in this photos.
Stand facing away from the sun (facing your shadow) and hold the
can above your head so that you are looking at the bottom of the
tinder and the side of the can instead of the top of the tinder and
the mirror. Move the tinder to find the brightest spot.
(Thanks to Thomas for this tip)
After a very short time (only a few seconds
in the bright sun), the tinder
fungus will be smouldering. Then transfer it to a tinder bundle and
blow it into flame (if you're using a large enough piece of tinder
fungus). If you're using a very small piece, then transfer the
ember to a larger piece by holding the two pieces together and blowing
on them.
Alternatively, you could use a small bundle of very volatile
tinder.
Some people have made videos of their attempts to make fire using this
method. There were three of these on YouTube - only one left now, and
unfortunately it is fake (can you figure out what's
wrong with it?). Wildwood Survival is the
original source of this concept, however.
P.S. Can you see what's wrong with the
above video?
Watch it carefully!
You may have thought of using the polished can bottom as a
reflector to signal passing aircraft, vehicles, people, whatever, if you are
in a waiting-to-be-rescued survival situation. However, this probably won't
be very effective. Rob Bicevskis explains:
"What we have created is more or less a parabolic reflector. This means that
it focuses (more or less) parallel rays of light from the sun to (more or
less) a point. If the focused light is not stopped by tinder - the light
beyond the focal point continues outward and becomes unfocused very rapidly.
Have a look at the "focusing" pictures in the "Something's
Burning in the Kitchen" article. As we move the "test strip" upwards,
the "circle" of light gets smaller. It goes to a "point" and then gets
bigger again.
A parabolic reflector is not a good signal mirror. In theory, a very very
very slightly parabolic mirror would be fine. In practice, a "plane" mirror
is probably the best solution. The reflected light does diverge somewhat
(since the sun's rays are not parallel.) But this is OK since if we are
trying to signal something that is miles away, we don't want the light to be
focused to a point - it would be much too hard to aim.
If we "invert the problem" and put a "point" light source at the focal point
of our mirror, then we will produce a beam that has (more or less) parallel
rays of light. This would be a good thing for signalling. This is also what
we call a "flashlight!"
For something slightly different to do with a pop can, yet still related to
fire, go to
this
page on PCTHiker.com, where the author describes how to make an alcohol
backpacking stove from a Pepsi can.
Emails from people who have done it
Here is an email exchange with "Billy", who tried this method with
success. At first, he had trouble figuring out how to do it, but with a
little help, he then went out and actually got fire!
February-March 2003
Email received February 25, 2003:
That's pretty neat. Ok guys, I've tried for two days to figure the coke can
fire thing out. You have stumped me to never ending on this one. It's wore
me to the bones now. Has anyone figured it out yet? This would be neat to
know and show youngsters and scouts. It appears that there is a oval shaped
glass in the indention in the bottom of the can. Or a liquid of some kind. I
just can't tell from the picture. Of all the fire making techniques I've
done and learned in the military I've gotta say this one is the neatest
sounding and one I've never heard of. Could you please let me in on it? I'd
like to test it and see if it works before I have to deploy again. Thank you
very much for your time. Billy.
Reply back to "Billy":
The key question to ask here is ... how did the bottom of the coke can get
shiny? Well, the bottom of the coke can happens to be an excellent
reflector. That is once it is shined up. It's not shiny enough as it comes.
That's the job of the chocolate bar. Apparently chocolate can act as a
polish. :) So, once you've shined it up....you hold a small piece of tinder
at the focal point of the parabolic reflector, in the sun, and you'll get a
coal.
Email received on February 26, 2003:
Ohhhhhhhh MAN!!! That "was" my first guess because I know that the
bottom of a can is not shiny like you are mentioning (I didn't think of
using a chocolate bar, I just thought the bottom needed shinning up somehow
first). It appears that there is trees reflecting off of it in the picture.
But I "never" thought of using a chocolate bar to do such a thing.
That is wild. Who would've ever guessed such a thing? That's neater than
sliced bread. I made it harder than it should have been apparently. I'm
going to polish one up to see how it does right now. I'll use some Hershey's
Kisses, they're chocolate, extremely chocolaty at that. I'll have to wait
for the clouds to leave this week to try it though. This will be most
interesting. Wonder if the cold weather will effect the out come even if one
has a bright sunny day. I've never used a reflector method in the winter
time months. I'll let you know eventually how it turns out. You did well :-)
Good stumper bro. That is a good one. Thanks friend for your time and info.
What a deal :-)
Billy.
A subsequent email received March 2, 2003:
Soda can & Chocolate bar fire "Does Work" :-)
The coke can (any soda can) and chocolate bar fire "DOES WORK". I
just now did it. Finally got some sun around here. It's like 45 degrees
outside, partly to mostly sunny today and I just made a nice coal and fire
with red cedar bark over the soda can about 1" to 1 1/4" over the
center of the dish of the can (to concentrate the focal point). I rolled the
small amount of bark up like a thick cigarette a couple inches in length.
Folded it over on itself (like you would see twist tobacco done). Tested
focal point with finger, Ouch! that burned, dang it! Pointed can toward the
sun and brought the bark in from the side (as not to block the suns rays
with my fingers in the way), rolled the bark around a bit to find a good
surface area for the focal point of the light to hit flat and good. Bam! no
time flat that sucker was a small coal. Worked quite well actually. Put in
other tinder ball, made fire. So there ya go, it does work. BBB.
The following email was received from "Bob" in March
2004:
We've been teaching "fire without matches" to new Boy
Scouts in our troop (T513, Austin, TX) for several years now. As you might
expect with 11-year-old boys, the kids love it. This year someone brought me
a printout from your website with instructions on the coke can and chocolate
bar method of starting a fire. Looked interesting, so we added it to our
instruction mix and gave it a try...
[Later ...]
Worked like a charm. Since we needed to prep a number of cans for our
classes, we cheated a bit and started our polishing with Comet cleanser,
then moved up to a "whitening" toothpaste before finishing off with
chocolate. On a bright Texas winter day, about 60 degrees with no clouds,
the cans gave us flames (not just embers) on pieces of shredded inner bark
from Texas cedar in just 1-2 minutes. Very consistent, if a bit fattening!
A humorous take on this process, from "John" Apr 2005:
This is
a joke, right? I tried this several times and found it impossible to complete
this task without eating all of the chocolate. I even tried some cheap
chocolate, like Palmers, that didn't taste very good. I still failed. Any
suggestions? My wife thinks I should put duct tape over my mouth. I think that's
a bit drastic.
Another success story, from "Sarah" July 2005:
Dude. This is
awesome. I lit my cigarette off of the flame. God bless the Florida sunlight, and
my OCD which allowed me to polish the damn can for 2 hours.
From "Ed" in San Diego, California, July 31/05:
Hello,
Your pages on the Coke can fire starter are great... very interesting. Anything
to do with mirrors and sunlight fascinates me. Our hiking group used to do a lot
of long distance mirror signalling between mountains.
I rough polished my Coke can with 1500 grit wet/dry paper (wet), then finished
polished with Turtle Wax car wax and a piece of terry cloth. I placed the can on
a table so I could really bear down on it. After about 15 minutes if was very
shiny and I managed to light a couple of dead leaves. Neat site... thanks.
Copyright by Walter Muma
This article and photographs may not be reproduced without permission