|
|
Home →
Survival →
Fire →
Fire Pistons
Model "T" Fire Piston
Article and photographs by Rob Bicevskis
Page 1 of 3
Page 1
Page 2
Page 3
|
|
*** WARNING
***
This page
contains instructions on how to make a fire piston
using "common" materials. The pressures
generated in a fire piston are very high and may be
beyond the design limits of some of the component
materials. If you try building a fire piston
according to these directions, you do so at your own
risk. I have not had any catastrophic failures
with this design, but that doesn't mean it won't or
can't happen. Please take appropriate safety
precautions.
|
|
|
|
|
 |
The Wildwood
Survival website contains a few articles and references
to Fire Pistons. A number of people have
emailed me about making or buying Fire Pistons.
In some cases, the first emails were about help in
building a Fire Piston, and subsequent emails have
been about where to buy one. This is
indicative of the success rate that people have been
having in the construction phase!
(By the way, I don't sell Fire Pistons. If
you want a ready-made unit, there are people such as
Jeff Wagner and Steve Leung who have been making
Fire Pistons for a while and would be happy to sell
you one. I have one of Jeff's fire pistons.
He makes a beautiful quality product. I met
Steve Leung a number of years ago and have seen his
fire pistons in action. Check out the
web-sites that belong to either of these guys.)
A friend, Ron White, and I have been building
various types of fire pistons over the last number
of years. I have experimented with styles that
more or less required a lathe in the construction
process. Ron has played more with what can be
done with "common household materials." The
result of much of this experience is encapsulated in
this web page.
About a hundred years ago, Henry Ford said about
the Model T Ford: "I will build a motor car for the
great multitude."
Well, the Model T Fire Piston is a design for the
abo masses.
(There must be at least a hundred of us or so,
no???)
The idea of the Model T Fire Piston is that for 5
bucks and an afternoon of effort, you can build
their own fire piston. No special tools or
skill are required. Clearly this PVC based
design isn't as elegant as other
wood/plastic/bamboo/horn/bone models, but it is a
great intro to Fire Pistons and is a great platform
for experimenting. |
|
|
 |
Ok, you've
read this far, and I know you're asking: "whadda I
get for 5 bucks and a few hours of my time?" Well,
I'm glad you asked.
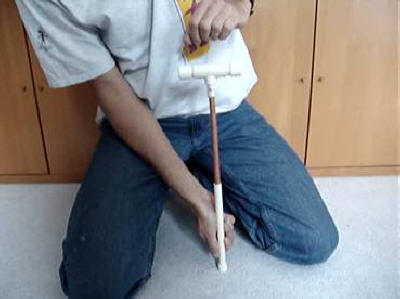
Click on the video to the left and you will see the
Model T Fire Piston in action.
Wasn't the video neat? I hear you saying:
"yes, yes, I want to build one!" |
|
|
| Building the Model T Fire
Piston |
| |
|
|
|
O-Ring
Plunger Parts List |
Amount Needed |
|
|
|
|
3/4" CPVC End Cap |
2 |
|
3/4"-1/2"-3/4" T Fitting |
1 |
|
1.4" of 3/4" CPVC Pipe |
2 |
|
1.5" of 1/2" CPVC Pipe |
1 |
|
#6 Wood Screw 1/2" Long |
1 |
|
11" of 1/2" Hardwood Dowel |
1 |
|
Wine Bottle Cork |
1 |
|
5/16"x7/16" O-Ring |
1 |
|
|
|
|
Cylinder Parts List |
Amount Needed |
|
|
|
|
1/2" CPVC |
9" |
|
1/2" CPVC End Cap |
1 |
|
|
|
|
O-Ring Grove Jig |
Amount Needed |
|
|
|
|
1.5" of 1/2" CPVC Pipe |
2 |
|
1" of 1/2" CPVC Pipe |
1 |
|
1" of 1/2" Hardwood Dowel |
1 |
|
1/2" CPVC End Cap |
1 |
|
1/2"-1/2"-1/2" T Fitting |
1 |
|
|
|
|
Miscellaneous |
Amount Needed |
|
|
|
|
Glue for CPVC |
Dab |
|
Epoxy Glue for O-Ring Groove |
Dab |
|
Vaseline |
Dab |
|
Tinder |
Some |
|
|
Here is the parts list
for the Model T Fire Piston. All of these items
can be bought at your local hardware store.
See below for details and some construction
options. If you opt for the syringe-style gasket,
then you can substitute any 7/16" dowel for the 1/2"
dowel in the parts list. Also, you won't need
the O-ring Grove Jig parts. |
|
| |
|
| Building the cylinder |
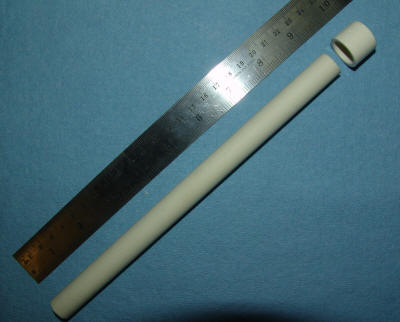 |
While boring
an acceptable hole in a piece of wood or plastic
isn't always easy, making the cylinder from CPVC is
a trivial exercise.
Cut a 9" piece of 1/2" ID CPVC. |
|
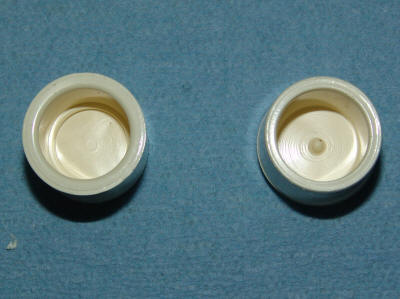 |
When buying your "end
caps," check to see whether the ones at your local
store have a "nipple" inside. If
the nipple is there, it will press against the
plunger, or against the tinder in the end of the
plunger. So, either buy end caps such as the
one on the left that don't have the nipple, or if
you end up with a cap such as the one on the right,
it is better to carve it out. If you have CPVC
cement, use it to seal one end cap to the end of the
cylinder. If you don't have CPVC cement, you
can also use epoxy glue. You will need epoxy glue
later in this project, so if you need to buy
adhesives, buy the epoxy. It is a waste to buy
a whole can of CPVC cement since so little is
required.
Using sandpaper, or a knife, smooth out the
inside edge of the opening of the cylinder.
This will allow the plunger to be inserted more
easily.
There, the cylinder is done!
|
|
|
| Building the Plunger - The
Handle |
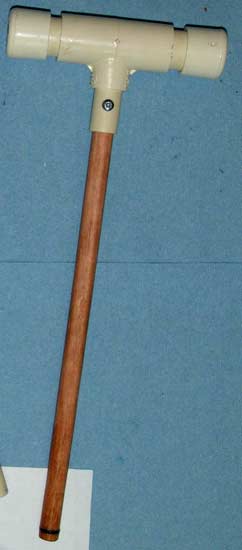 |
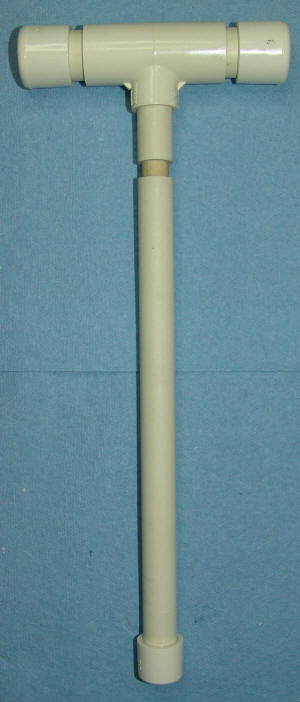
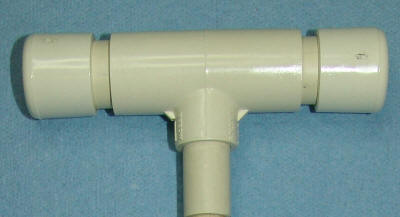
This is what
the plunger looks like when it is finished.
The "T" handle is an ergonomic way of holding the
plunger.
It also provides storage. |
|
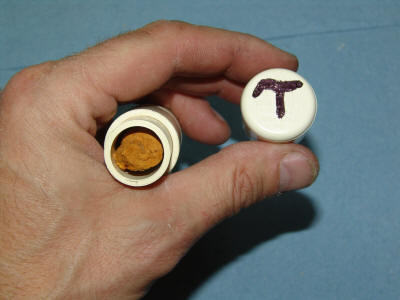 |
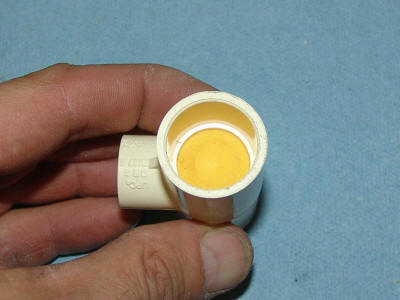
Removing one
end-cap from the handle reveals the storage area for
tinder. |
|
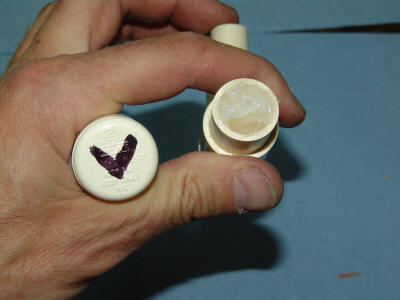 |
Removing the
other end-cap show where Vaseline is stored.
The Vaseline is used to lubricate the plunger
O-ring. It can also applied to cotton balls,
or other organic material and makes a great
fire-starter. |
|
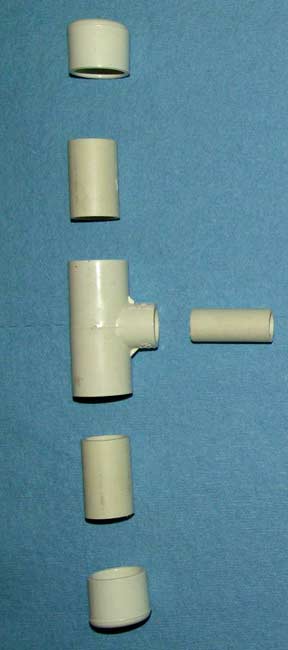 |
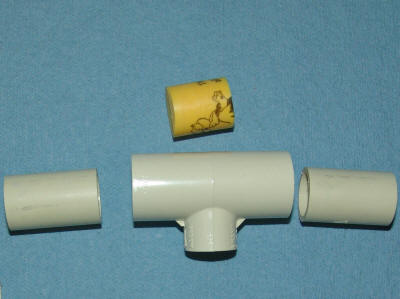
Here is an
exploded view of the top portion of the plunger.
Refer to the parts list for the lengths of the
CPVC pieces. |
|
 |
The first
construction step is to cut the cork in half and
press-fit it into the 3/4"-1/2"-3/4" T Fitting.
The purpose of the cork is to separate the tinder
and lubricant compartments in an air-tight and
water-tight fashion. If you don't want to
bother with storage in the handle portion, you can
skip this step. |
|
 |
This is what
things should look like with the cork inserted.
You can now cement (CPVC glue or epoxy) the two
1.4" of 3/4" CPVC Pipe pieces to the T fitting.
Also, cement the 1.5" of 1/2" CPVC Pipe to the
remaining opening on the T fitting.
|
|
 |
This is what
things should look like at this point.
..... on to Page 2 |
|
|
|
Page 1
Page 2
Page 3 |
|
|
|
|

